# Product Updates
Source: https://docs.pixeltable.com/docs/changelog/product-updates
Keep track of changes
### Highlights
* Added AWS Bedrock Adapter for expanded LLM integration options
* Built Reddit Agentic Bot
### Enhancements
* Improved Table.\_descriptors() functionality
* Added markdown support when displaying table/dataframe descriptors
* Removed internal column types from pixeltable top level module
* Used source CTE explicitly to generate GROUP BY for query optimization
* Added comprehensive user workflow test script with timing
### Fixes
* Improved error reporting in ExprEvalError
* Ensured that extra\_fields is properly set in TableDataConduit
### Highlights
* Introduced pxt.retrieval\_tool() for exposing tabular data as a RAG data source
* Added client-side support for publishing snapshots. Sign up for [cloud preview](https://www.pixeltable.com/waitlist)
### Enhancements
* Added graceful handling of keyboard interrupts
### Fixes
* Fixed concurrency issues with directory operations
* Fixed grouping aggregation-related bugs
### Highlights
* Added support to initialize Pixeltable with database connection strings
* Added support for separate userspaces in the Pixeltable catalog
### Enhancements
* Improved file format detection by preferring file extension over puremagic
* Enabled table.select(None) functionality
* Integrated JsonMapper with async expression evaluation
* Widened numpy version compatibility
### Fixes
* Fixed add\_embedding\_index() when embedding function has arity > 1
* Disallowed updates to media columns
### Highlights
* Introduced `pxtf.map()` as a replacement for the `>>` operator to create JsonMappers
* Added string concatenation operations (`+` and `*`) support in arithmetic expressions
* Incorporated import operations into table\_create and insert methods
* Added access method for embedding indices
* Switched to pixeltable-yolox for computer vision functionality
### Enhancements
* Restructured documentation for improved navigation and clarity
* Added table IDs to Pixeltable markdown documentation
* Added create\_parents option to create\_dir to automatically create missing parent directories
* Improved JsonMapper functionality with new unit tests for QueryTemplateFunction
### Fixes
* Fixed event loop debug logging
* Resolved syntax errors in documentation
* Addressed bugs in directory operations, particularly when drop\_dir() is the first operation after catalog load
* Fixed issues with chained tool calling
* Corrected bug involving @pxt.query instances with default parameter values
* Improved JsonPath serialization
### Highlights
* Introduced linting for improved code quality
* Added just-in-time initialization for spaCy, improving pxt.init() performance
* Made catalog changes to prepare for concurrency support
### Enhancements
* Added video index to cookbook
* Updated configurations page to match API reference
* Added MCP to documentation
* Improved documentation with updated vision search examples
### Fixes
* Implemented graceful failure handling for backwards incompatibility in computed column UDF calls
* Various bugfixes and improvements
* Updated Label Studio job to Python 3.10 in nightly CI
### Highlights
* Enhanced OpenAI/Anthropic integration with support for multiple invocations of the same tool in tool calling logic
### Highlights
* Added Deepseek integration
* Implemented data sharing logic for publishing snapshots
* Enhanced UDF handling in computed columns
* Migrated to Mintlify documentation
### Enhancements
* Improved test suite with pytest fixtures for Hugging Face embedding models
* Enabled view creation from dataframes with select clause
* Updated PyAV to 14.2 and WhisperX to 3.3.1
* Improved handling of relative pathnames and filenames with unusual characters
### Documentation
* Fixed documentation for stored attribute on computed columns
* Added audio file examples
### Development & Infrastructure
* Updated llama\_cpp version (disabled in non-Linux CI)
* Implemented release script fixes for Poetry 2.0
### Highlights
* Added support for OpenAI reasoning models
* Introduced tables as UDFs for more modular workflows
* Implemented AudioSplitter support for audio processing
* Enabled all types of computed columns to be unstored for flexibility
* Added support for variable parameters in query limit() clause
* Enhanced data management with a packager for table data
* Updated PostgreSQL to version 16.8 and pgvector to 0.8.0
### Enhancements
* Improved parallel execution capabilities
* Added support for generalized arrays (unparameterized/with only a dtype)
* Allowed numpy.ndarray arrays to be used as Literal constants
* Enhanced type checking for tests package
* Improved handling of collections with all constants as Literals
* Converted more UDFs to async for better performance
* Added verbose system config option for improved debugging
### Fixes
* Fixed FastAPI integration bug
* Resolved issues with AsyncConnectionPool behavior
* Improved test resiliency and reliability
* Fixed tiktoken dependency issue
* Corrected validity of column error properties
* Upgraded httpcore for better compatibility
* Fixed notebook test failures
### Development & Infrastructure
* Added archive functionality for Pixeltable logs from every test run
* Improved CI/CD workflow with tmate in detached mode
* Enhanced documentation with updates to numerous guides
* Streamlined API syntax for better developer experience
* Updated example applications to use new query syntax
### Highlights
* Enhanced Function Support with multiple signatures capability for Functions, UDFs, and UDAs
* Improved Data Validation with JSON Schema validation for JsonType columns
* Enhanced Database Reliability by changing SQL Engine isolation level to 'REPEATABLE READ'
### Enhancements
* Added ifexists parameter to create\* APIs for better control
* Improved DataFrame docstrings for better documentation
* Fixed indexed column loading for views
* Enhanced type validation by preventing bool literals in int columns
* Improved handling of index name conflicts
### Documentation & Examples
* Updated Discord Bot documentation
* Added Gemini integration examples
### Fixes
* Fixed assertion in ReloadTester
* Resolved pgserver-related issues for Docker and windows setup
### Highlights
* Added Python 3.13 Support
* Introduced basic joins functionality for tables
* Added Gemini AI integration
* Implemented Parquet export API
* Extended document support to include .txt files
### Enhancements
* Added test utility for query result verification after catalog reload
* Fixed Optional vs. Required handling in astype()
* Updated Ollama integration for version 0.4.0
* Added graceful error handling when using dropped catalog.Tables
* Reorganized docs and examples folders
* Added feature guide for time zones
* Made Tables, DataFrames, and Expressions repr output more user-friendly
### Fixes
* Fixed string comparison to use != instead of 'is not'
* Resolved various development environment configuration issues
### New Contributors
* @jacobweiss2305 made his first contribution
### Highlights
* Added Context-Aware Discord Bot with Semantic Search Capabilities
* Introduced TileIterator for efficient data processing
* Migrated to torchaudio from librosa for improved audio preprocessing
### Enhancements
* Implemented reusable retry script for CI workflows
* Added configuration documentation (config.md)
* Enhanced Function bindings with partial support
* Fixed backwards-incompatible Mistral API changes
* Improved create\_insert\_plan functionality
* Disabled sentence\_transformers tests on linux ARM for better stability
* Updated README.md with clearer organization
* Added support for table/column handles in APIs
### Highlights
* Added support for Ollama, llama\_cpp, and Replicate
* Switched FrameIterator to PyAV and added XML document type support
* Added Voxel51 integration for computer vision workflows
* Implemented custom type hints for all Pixeltable types
* Added support for converting aggregate FunctionCalls to SQL
* Streamlined create\_view API and enhanced documentation
### Development & Infrastructure
* Updated CI/CD configuration and Makefile
* Upgraded GitHub Actions to use macos-13
* Limited ubuntu-arm64 and ubuntu-x64-t4 to scheduled runs
* Added Image.point() to API
* Improved type-checking correctness across packages
* Enhanced documentation and display for new type hint pattern
### Fixes
* Fixed issues in working-with-huggingface notebook
* Resolved Replicate notebook compatibility with external URLs
* Ensured correct nullability in FunctionCall return types
* Added exception raising during add\_column() errors
* Allowed @query redefinition in notebook scope
* Updated BtreeIndex.str\_filter implementation
### Enhancements
* Added support for loading Hugging Face datasets containing images
* Implemented LRU eviction in FileCache for improved memory management
* Enhanced JSON path functionality to allow getitem syntax
* Updated iterators to handle None values as input
### Fixes
* Resolved an issue with the Together AI image endpoint
### Enhancements
* Initial support for converting FunctionCalls to SQL
* Added comprehensive time zone handling
* Improved type-checking correctness for catalog, functions, and ext packages
* Introduced integration with Mistral AI and Anthropic
* Added a new tutorial on computed columns
### Improvements
* Made mistune an optional dependency
### Fixes
* Resolved a circularity issue in database migration for schema version 19 -> 20
### Enhancements
* Improved type-checking system with groundwork and performance improvements
* Added cross-links to docstrings
* Enhanced create\_table to accept DataFrame directly
* Updated Postgres to version 16.4 and pgvector to 0.7.4
* Implemented Notebook CI and Nightly CI
### Fixes
* Fixed unit test for Together AI integration
* Resolved notebook regressions
* Updated to psycopg3 as Postgres driver
* Cleaned up Table class namespace
* Fixed JSON serialization and literal handling
### Highlights
* Optimized data loading with StoreBase.load\_column()
* Added support for lists, dictionaries, and non-numpy datatypes in import\_pandas
* Enhanced video frame extraction control in FrameIterator
* Added UDF draw\_bounding\_boxes() for object detection visualization
* Migrated to Pixeltable-compatible pgserver fork
* Made all column types stored by default
### New Features
* Added import\_json() and import\_rows() functions
* Expanded timestamp functions library
* Added aggregate make\_list() function
### Improvements
* Simplified method call syntax
* Enhanced notebook experience
* Improved test coverage and automation
### Fixes
* Updated database version
* Removed support for Python datetime.date
* Improved CSV import with nullable types
### Features
* Added Label Studio integration with pre-signed URLs for S3 buckets
* Enhanced compatibility with newer versions of label-studio-sdk
* Added new String functions
* Introduced new tutorial about Tables and Data Operations
### Features
* Added force=True option for drop\_table and drop\_dir functions
* Enhanced API usability and functionality
* Updated tutorials covering OpenAI, Together, Fireworks, and indexing
# Bringing Data
Source: https://docs.pixeltable.com/docs/datastore/bringing-data
A comprehensive guide to inserting, referencing, and importing data in Pixeltable
# Working with Data in Pixeltable
Pixeltable provides a unified interface for working with diverse data types - from structured tables to unstructured media files. This guide covers everything you need to know about bringing your data into Pixeltable.
## Supported Data Types & Formats
```python
import pixeltable as pxt
from datetime import datetime
# Create table with basic data types
basic_table = pxt.create_table('myproject.basic_types', {
'id': pxt.Int, # Integer values
'score': pxt.Float, # Floating point numbers
'active': pxt.Bool, # Boolean values
'name': pxt.String, # Text data
'created_at': pxt.Timestamp # DateTime values
})
# Insert single row
basic_table.insert([
{
'id': 1,
'score': 95.5,
'active': True,
'name': 'Example',
'created_at': datetime.now()
}
])
# Batch insert
basic_table.insert([
{
'id': 2,
'score': 88.3,
'active': True,
'name': 'Test A',
'created_at': datetime(2024, 1, 1)
},
{
'id': 3,
'score': 76.9,
'active': False,
'name': 'Test B',
'created_at': datetime(2024, 1, 15)
}
])
# Import from CSV
pxt.io.import_csv('myproject.from_csv', 'data.csv',
schema_overrides={
'id': pxt.Int,
'score': pxt.Float,
'active': pxt.Bool,
'created_at': pxt.Timestamp
}
)
# Import from Excel
pxt.io.import_excel('myproject.from_excel', 'data.xlsx',
schema_overrides={
'id': pxt.Int,
'score': pxt.Float,
'active': pxt.Bool,
'created_at': pxt.Timestamp
}
)
```
```python
# Create table with array columns
array_table = pxt.create_table('myproject.arrays', {
'fixed_vector': pxt.Array[(768,), pxt.Float], # Fixed-size vector
'variable_tensor': pxt.Array[(None, 512), pxt.Float], # Variable first dimension
'any_int_array': pxt.Array[pxt.Int], # Any-shaped integer array
'any_float_array': pxt.Array[pxt.Float], # Any-shaped float array
'completely_flexible': pxt.Array # Any array (shape and dtype)
})
# Insert array data
array_table.insert([{
'fixed_vector': np.random.randn(768),
'variable_tensor': np.random.randn(5, 512),
'any_int_array': np.array([1, 2, 3, 4]), # 1D array
'any_float_array': np.random.randn(3, 3), # 2D array
'completely_flexible': np.array([[1, 2], [3, 4]]) # Any numpy array
}])
```
```python
# Create table with JSON columns
json_table = pxt.create_table('myproject.json_data', {
'metadata': pxt.Json, # Arbitrary JSON data
'config': pxt.Json, # Configuration objects
'features': pxt.Json # Nested structures
})
# Insert structured data
json_table.insert([
{
'metadata': {
'source': 'api',
'version': '1.0',
'tags': ['test', 'example']
},
'config': {
'mode': 'testing',
'parameters': {
'batch_size': 32,
'learning_rate': 0.001
}
},
'features': {
'numeric': [1, 2, 3],
'categorical': {
'color': 'red',
'size': 'large'
}
}
}
])
# Import JSON file
pxt.io.import_json('myproject.from_json', 'data.json',
schema_overrides={
'metadata': pxt.Json,
'config': pxt.Json
}
)
```
```python
# Create table with image columns
image_table = pxt.create_table('myproject.images', {
'original': pxt.Image, # Any valid image
'thumbnail': pxt.Image[(224, 224)], # Fixed size constraint
'rgb_only': pxt.Image['RGB'], # Mode constraint
'thumbnail_rgb': pxt.Image[(64, 64), 'RGB'] # Both constraints
})
# Insert local files
image_table.insert([
{'original': '/path/to/image1.jpg'},
{'original': '/path/to/image2.png'}
])
# Insert URLs
image_table.insert([
{'original': 'https://example.com/image1.jpg'},
{'original': 'https://example.com/image2.png'}
])
# Insert from cloud storage
image_table.insert([
{'original': 's3://my-bucket/image1.jpg'}
])
```
```python
# Create table with video columns
video_table = pxt.create_table('myproject.videos', {
'video': pxt.Video, # Video file reference
})
# Insert local video files
video_table.insert([
{'video': '/path/to/video1.mp4'},
{'video': '/path/to/video2.webm'}
])
# Insert video URLs
video_table.insert([
{'video': 'https://example.com/video1.mp4'},
{'video': 'https://example.com/video2.webm'}
])
# Insert from cloud storage
video_table.insert([
{'video': 's3://my-bucket/video1.mp4'}
])
```
```python
# Create table with audio columns
audio_table = pxt.create_table('myproject.audio', {
'audio': pxt.Audio, # Audio file reference
})
# Insert local audio files
audio_table.insert([
{'audio': '/path/to/audio1.mp3'},
{'audio': '/path/to/audio2.wav'}
])
# Insert audio URLs
audio_table.insert([
{'audio': 'https://example.com/audio1.mp3'},
{'audio': 'https://example.com/audio2.wav'}
])
# Insert from cloud storage
audio_table.insert([
{'audio': 's3://my-bucket/audio1.mp3'}
])
```
```python
# Create table with document columns
doc_table = pxt.create_table('myproject.documents', {
'document': pxt.Document, # Document file reference
})
# Insert local documents
doc_table.insert([
{'document': '/path/to/doc1.pdf'},
{'document': '/path/to/doc2.docx'},
{'document': '/path/to/text1.md'}
])
# Insert document URLs
doc_table.insert([
{'document': 'https://example.com/doc1.pdf'},
{'document': 'https://example.com/doc2.docx'}
])
# Insert from cloud storage
doc_table.insert([
{'document': 's3://my-bucket/doc1.pdf'}
])
```
## Import Functions
```python
# Basic CSV import with schema inference
table1 = pxt.io.import_csv(
'myproject.data',
'data.csv'
)
# CSV import with schema overrides
table2 = pxt.io.import_csv(
'myproject.data_typed',
'data.csv',
schema_overrides={
'id': pxt.Int,
'name': pxt.String,
'score': pxt.Float,
'active': pxt.Bool,
'created_at': pxt.Timestamp
}
)
# CSV import with pandas options
table3 = pxt.io.import_csv(
'myproject.data_options',
'data.csv',
sep=';', # Custom separator
encoding='utf-8', # Specify encoding
na_values=['NA', '-'], # Custom NA values
parse_dates=['date'] # Parse date columns
)
```
```python
# Basic Excel import
table1 = pxt.io.import_excel(
'myproject.excel_data',
'data.xlsx'
)
# Excel import with schema overrides
table2 = pxt.io.import_excel(
'myproject.excel_typed',
'data.xlsx',
schema_overrides={
'id': pxt.Int,
'amount': pxt.Float,
'date': pxt.Timestamp
}
)
# Excel import with options
table3 = pxt.io.import_excel(
'myproject.excel_options',
'data.xlsx',
sheet_name='Sheet2', # Specific sheet
header=1, # Header row
na_values=['NA', '-'], # Custom NA values
parse_dates=['date'] # Parse date columns
)
```
```python
# Basic Parquet import
table1 = pxt.io.import_parquet(
table='myproject.parquet_data',
parquet_path='data.parquet'
)
# Parquet import with schema overrides
table2 = pxt.io.import_parquet(
table='myproject.parquet_typed',
parquet_path='data.parquet',
schema_overrides={
'features': pxt.Array[(100,), pxt.Float],
'labels': pxt.Array[(10,), pxt.Int]
}
)
# Import from directory of Parquet files
table3 = pxt.io.import_parquet(
table='myproject.parquet_dir',
parquet_path='data/*.parquet' # Glob pattern
)
```
```python
# Basic JSON import
table1 = pxt.io.import_json(
'myproject.json_data',
'data.json'
)
# JSON import with schema overrides
table2 = pxt.io.import_json(
'myproject.json_typed',
'data.json',
schema_overrides={
'metadata': pxt.Json,
'features': pxt.Array[(None,), pxt.Float]
}
)
# Import from URL
table3 = pxt.io.import_json(
'myproject.json_url',
'https://api.example.com/data.json'
)
```
```python
import datasets
# Load Hugging Face dataset
dataset = load_dataset('mnist', split='train[:1000]')
# Import with default schema inference
table1 = pxt.io.import_huggingface_dataset(
'myproject.hf_data',
dataset
)
# Import with schema overrides
table2 = pxt.io.import_huggingface_dataset(
'myproject.hf_typed',
dataset,
schema_overrides={
'image': pxt.Image,
'label': pxt.Int
}
)
# Import with split information
table3 = pxt.io.import_huggingface_dataset(
'myproject.hf_split',
dataset,
column_name_for_split='split_info'
)
```
## Key Points
* All media types (Image, Video, Audio, Document) support local files, URLs, and cloud storage paths
* Array types require explicit shape and dtype specifications
* JSON type can store any valid JSON data structure
* Basic types (Int, Float, Bool, String, Timestamp) match their Python equivalents
* Import functions support schema overrides to ensure correct type assignment
* Use batch inserts for better performance when adding multiple rows
* Cloud storage paths (s3://) require appropriate credentials to be configured
# Computed Columns
Source: https://docs.pixeltable.com/docs/datastore/computed-columns
Computed columns combines automatic calculations with smart incremental updates. Think of them as your data workflow automated.
Learn more about computed columns with our [in-depth guide](https://github.com/pixeltable/pixeltable/blob/main/docs/notebooks/fundamentals/computed-columns.ipynb).
## What are Computed Columns?
Computed columns are permanent table columns that automatically calculate values based on expressions involving other columns. They maintain those calculations as your data changes, enabling seamless data transformations without manual updates.
## Why use computed columns?
You would use computed columns when you want to:
* Compute a value based on the contents of other columns
* Automatically update the computed value when the source data changes
* Simplify queries by avoiding the need to write complex expressions
* Create reproducible data transformation pipelines
## How to create a computed column
```python
import pixeltable as pxt
# Create a table with population data
pop_t = pxt.io.import_csv(
'fundamentals.population',
'https://github.com/pixeltable/pixeltable/raw/main/docs/source/data/world-population-data.csv'
)
# Add a computed column for year-over-year change
pop_t.add_computed_column(yoy_change=(pop_t.pop_2023 - pop_t.pop_2022))
# Create a computed column to track population change year over year
pop_t.add_computed_column(yoy_change=(pop_t.pop_2023 - pop_t.pop_2022))
# Display the results
pop_t.select(pop_t.country, pop_t.pop_2022, pop_t.pop_2023, pop_t.yoy_change).head(5)
```
As soon as the column is added, Pixeltable will (by default) automatically compute its value for all rows in the table, storing the results in the new column.
In traditional data workflows, it is commonplace to recompute entire pipelines when the input dataset is changed or enlarged. In Pixeltable, by contrast, all updates are applied incrementally. When new data appear in a table or existing data are altered, Pixeltable will recompute only those rows that are dependent on the changed data.
## Building workflows
Let's explore another example that uses computed columns for image processing operations.
```python
# Create a table for image operations
t = pxt.create_table('fundamentals.image_ops', {'source': pxt.Image})
# Extract image metadata (dimensions, format, etc.)
t.add_computed_column(metadata=t.source.get_metadata())
# Create a rotated version of each image
t.add_computed_column(rotated=t.source.rotate(10))
# Create a version with transparency and rotation
t.add_computed_column(rotated_transparent=t.source.convert('RGBA').rotate(10))
```
Once we insert data, it will automatically compute the values for the new columns.
```python
# Insert sample images from a GitHub repository
url_prefix = 'https://github.com/pixeltable/pixeltable/raw/main/docs/source/data/images'
images = ['000000000139.jpg', '000000000632.jpg', '000000000872.jpg']
t.insert({'source': f'{url_prefix}/{image}'} for image in images)
# Display the original and rotated images
t.select(t.source, t.rotated).limit(2)
```
Pixeltable will automatically manage the dependencies between the columns, so that when the source image is updated, the rotated and rotated\_transparent columns are automatically recomputed.
You don't need to think about orchestration. Our DAG engine will take care of the dependencies for you.
## Key Features
Only recomputes values for rows affected by changes in source columns, saving processing time and resources.
Tracks relationships between columns and handles the execution order of computations automatically.
Supports complex expressions combining multiple columns, Python functions, and built-in operations.
Ensures type consistency across computations and validates expressions at creation time.
## Advanced Usage
### Using Python Functions
You can use Python functions in computed columns using the `@pxt.udf` decorator:
```python
@pxt.udf
def calculate_growth_rate(current: float, previous: float) -> float:
"""Calculate percentage growth rate between two values"""
if previous == 0:
return 0 # Handle division by zero
return ((current - previous) / previous) * 100
pop_t.add_computed_column(
growth_rate=calculate_growth_rate(pop_t.pop_2023, pop_t.pop_2022)
)
```
### Chaining Computations
Computed columns can depend on other computed columns:
```python
# First computed column: calculate total population change over 3 years
pop_t.add_computed_column(total_change=pop_t.pop_2023 - pop_t.pop_2020)
# Second computed column: calculate average yearly change using the first column
pop_t.add_computed_column(
avg_yearly_change=pop_t.total_change / 3
)
```
## Best Practices
* **Break down complex operations**: Split complex operations into multiple columns for better readability and easier debugging
* **Handle missing values**: Explicitly handle None/null values to prevent unexpected errors
* **Consider performance**: For large tables, minimize the use of computationally expensive operations
* **Document your transformations**: Add comments explaining the purpose and logic of your computed columns
* **Reuse common calculations**: Create intermediate computed columns for values used in multiple places
## Troubleshooting
### Common Issues
* **Type mismatches**: Ensure input and output types are compatible
* **Missing dependencies**: A computed column will show as None if its inputs are None
* **Performance issues**: Very complex computations on large tables might become slow
## Additional Resources
Complete API reference
Example implementations
# Custom Functions (UDFs)
Source: https://docs.pixeltable.com/docs/datastore/custom-functions
Create and use custom functions (UDFs) in Pixeltable
## What are User-Defined Functions?
User-Defined Functions (UDFs) in Pixeltable allow you to extend the platform with custom Python code. They bridge the gap between Pixeltable's built-in operations and your specific data processing needs, enabling you to create reusable components for transformations, analysis, and AI workflows.
Pixeltable UDFs offer several key advantages:
* **Reusability**: Define a function once and use it across multiple tables and operations
* **Type Safety**: Strong typing ensures data compatibility throughout your workflows
* **Performance**: Batch processing and caching capabilities optimize execution
* **Integration**: Seamlessly combine custom code with Pixeltable's query system
* **Flexibility**: Process any data type including text, images, videos, and embeddings
UDFs can be as simple as a basic transformation or as complex as a multi-stage ML workflow. Pixeltable offers three types of custom functions to handle different scenarios:
```python
import pixeltable as pxt
# Basic UDF for text transformation
@pxt.udf
def clean_text(text: str) -> str:
"""Clean and normalize text data."""
return text.lower().strip()
# Use in a computed column
documents = pxt.get_table('my_documents')
documents.add_computed_column(
clean_content=clean_text(documents.content)
)
```
# User-Defined Functions in Pixeltable
Learn more about UDFs and UDAs with our [in-depth guide](https://github.com/pixeltable/pixeltable/blob/main/docs/notebooks/feature-guides/udfs-in-pixeltable.ipynb).
This guide covers three types of custom functions in Pixeltable:
1. Basic User-Defined Functions (UDFs)
2. Tables as UDFs
3. User-Defined Aggregates (UDAs)
## 1. Basic User-Defined Functions (UDFs)
### Overview
UDFs allow you to:
* Write custom Python functions for data processing
* Integrate them into computed columns and queries
* Optimize performance through batching
* Create reusable components for your data workflow
All UDFs require type hints for parameters and return values. This enables Pixeltable to validate and optimize your data workflow before execution.
### Creating Basic UDFs
```python Basic
@pxt.udf
def add_tax(price: float, rate: float) -> float:
return price * (1 + rate)
# Use in computed column
table.add_computed_column(
price_with_tax=add_tax(table.price)
)
```
```python With Type Checking
from typing import List
@pxt.udf
def process_tags(tags: List[str]) -> str:
return ", ".join(sorted(tags))
# Use in computed column
table.add_computed_column(
formatted_tags=process_tags(table.tags)
)
```
### UDF Types
```python
# Defined directly in your code
@pxt.udf
def extract_year(date_str: str) -> int:
return int(date_str.split('-')[0])
# Used immediately
table.add_computed_column(
year=extract_year(table.date)
)
```
Local UDFs are serialized with their columns. Changes to the UDF only affect new columns.
```python
# In my_functions.py
@pxt.udf
def clean_text(text: str) -> str:
return text.strip().lower()
# In your application
from my_functions import clean_text
table.add_computed_column(
clean_content=clean_text(table.content)
)
```
Module UDFs are referenced by path. Changes to the UDF affect all uses after reload.
```python
from pixeltable.func import Batch
@pxt.udf(batch_size=32)
def process_batch(items: Batch[str]) -> Batch[str]:
results = []
for item in items:
results.append(item.upper())
return results
# Used like a regular UDF
table.add_computed_column(
processed=process_batch(table.text)
)
```
Batched UDFs process multiple rows at once for better performance.
### Supported Types
Native Python types supported in UDFs:
```python
@pxt.udf
def process_data(
text: str, # String data
count: int, # Integer numbers
score: float, # Floating point
active: bool, # Boolean
items: list[str], # Generic lists
meta: dict[str,any] # Dictionaries
) -> str:
return "Processed"
```
Pixeltable-specific types:
```python
@pxt.udf
def process_media(
img: PIL.Image.Image, # Images
embeddings: pxt.Array, # Numerical arrays
config: pxt.Json, # JSON data
doc: pxt.Document # Documents
) -> str:
return "Processed"
```
### Performance Optimization
```python
@pxt.udf(batch_size=16)
def embed_texts(
texts: Batch[str]
) -> Batch[pxt.Array]:
# Process multiple texts at once
return model.encode(texts)
```
```python
@pxt.udf
def expensive_operation(text: str) -> str:
# Cache model instance
if not hasattr(expensive_operation, 'model'):
expensive_operation.model = load_model()
return expensive_operation.model(text)
```
```python
from typing import Optional, Literal, Union, Any
import json
@pxt.udf
async def chat_completions(
messages: list,
*,
model: str,
temperature: Optional[float] = None,
max_tokens: Optional[int] = None,
timeout: Optional[float] = None,
) -> dict:
# Setup API request with proper context management
result = await openai_client.chat.completions.with_raw_response.create(
messages=messages,
model=model,
temperature=temperature,
max_tokens=max_tokens,
timeout=timeout
)
# Process response
return json.loads(result.text)
# Example usage in a computed column
table.add_computed_column(
response=chat_completions(
[
{'role': 'system', 'content': 'You are a helpful assistant.'},
{'role': 'user', 'content': table.prompt}
],
model='gpt-4o-mini'
)
)
```
Async UDFs are specifically designed for handling external API calls, such as LLM calls, database queries, or web service interactions. They should not be used for general computation or data processing. They keep your Pixeltable workflows responsive by allowing background execution of time-consuming operations.
### Best Practices for Basic UDFs
* Always provide complete type hints
* Use specific types over generic ones
* Validate input ranges where appropriate
```python
@pxt.udf
def validate_score(score: float) -> float:
if not 0 <= score <= 100:
raise ValueError("Score must be between 0 and 100")
return score
```
* Use batching for GPU operations
* Cache expensive resources
* Process data in chunks when possible
```python
@pxt.udf(batch_size=32)
def process_chunk(items: Batch[str]) -> Batch[str]:
if not hasattr(process_chunk, 'model'):
process_chunk.model = load_expensive_model()
return process_chunk.model.process_batch(items)
```
* Keep related UDFs in modules
* Use clear, descriptive names
* Document complex operations
```python
@pxt.udf
def normalize_text(
text: str,
lowercase: bool = True,
remove_punctuation: bool = True
) -> str:
"""Normalize text by optionally lowercasing and removing punctuation."""
if lowercase:
text = text.lower()
if remove_punctuation:
text = text.translate(str.maketrans("", "", string.punctuation))
return text
```
* Define clear input and output columns for your table UDFs
* Implement cleanup routines for tables that grow large
* Balance between too many small tables and monolithic tables
* Use clear naming conventions for tables and their UDFs
* Document the purpose and expected inputs for each table UDF
## 2. Tables as UDFs
### Overview
Tables as UDFs allow you to:
* Convert entire tables into reusable functions
* Create modular and complex data processing workflows
* Encapsulate multi-step operations
* Share workflows between different tables and applications
Tables as UDFs are particularly powerful for building AI agents and complex automation workflows that require multiple processing steps.
### Creating Table UDFs
#### Step 1: Create a Specialized Table
```python
# Create a table with your workflow
finance_agent = pxt.create_table('directory.financial_analyst',
{'prompt': pxt.String})
# Add computed columns for processing
finance_agent.add_computed_column(/* ... */)
```
#### Step 2: Convert to UDF
```python
# Convert table to UDF by specifying return column
finance_agent_udf = pxt.udf(finance_agent,
return_value=finance_agent.answer)
```
#### Step 3: Use the Table UDF
```python
# Use like any other UDF
result_table.add_computed_column(
result=finance_agent_udf(result_table.prompt)
)
```
```python
import time
from typing import Optional
import yfinance as yf
import pixeltable as pxt
from pixeltable.functions.openai import chat_completions, invoke_tools
DIRECTORY = 'agent'
OPENAI_MODEL = 'gpt-4o-mini'
# Create Fresh Directory
pxt.drop_dir(DIRECTORY, force=True)
pxt.create_dir(DIRECTORY, if_exists='ignore')
# yfinance tool for getting stock information
@pxt.udf
def stock_info(ticker: str) -> Optional[dict]:
"""Get stock info for a given ticker symbol."""
stock = yf.Ticker(ticker)
return stock.info
# Helper UDF to create a prompt with tool outputs
@pxt.udf
def create_prompt(question: str, tool_outputs: list[dict]) -> str:
return f"""
QUESTION:
{question}
RESULTS:
{tool_outputs}
"""
```
```python
# Create Financial Analyst Agent Table
finance_agent = pxt.create_table(
f'{DIRECTORY}.financial_analyst',
{'prompt': pxt.String},
if_exists='ignore'
)
# Prepare initial messages for LLM
messages = [{'role': 'user', 'content': finance_agent.prompt}]
# Define available tools
tools = pxt.tools(stock_info)
# Get initial response with tool calls
finance_agent.add_computed_column(
initial_response=chat_completions(
model=OPENAI_MODEL,
messages=messages,
tools=tools,
tool_choice=tools.choice(required=True)
)
)
# Execute the requested tools
finance_agent.add_computed_column(
tool_output=invoke_tools(tools, finance_agent.initial_response)
)
# Create prompt with tool results
finance_agent.add_computed_column(
stock_response_prompt=create_prompt(
finance_agent.prompt,
finance_agent.tool_output
)
)
# Generate final response using tool results
final_messages = [
{'role': 'system', 'content': "Answer the user's question based on the results."},
{'role': 'user', 'content': finance_agent.stock_response_prompt},
]
finance_agent.add_computed_column(
final_response=chat_completions(
model=OPENAI_MODEL,
messages=final_messages
)
)
# Extract answer text
finance_agent.add_computed_column(
answer=finance_agent.final_response.choices[0].message.content
)
```
```python
# Convert the finance_agent table to a UDF
finance_agent_udf = pxt.udf(
finance_agent,
return_value=finance_agent.answer
)
```
```python
# Create a Portfolio Manager table that uses the finance agent
portfolio_manager = pxt.create_table(
f'{DIRECTORY}.portfolio_manager',
{'prompt': pxt.String},
if_exists='ignore'
)
# Add the finance agent UDF as a computed column
portfolio_manager.add_computed_column(
result=finance_agent_udf(portfolio_manager.prompt)
)
```
```python
# Get the portfolio manager table
portfolio_manager = pxt.get_table(f'{DIRECTORY}.portfolio_manager')
# Insert a test query
portfolio_manager.insert([
{'prompt': 'What is the price of NVDIA?'}
])
# View results
result = portfolio_manager.select(portfolio_manager.result).collect()
print(result)
```
### Flow Diagram
```mermaid
graph TD
A[User Prompt] --> B[Financial Analyst Table]
B --> C[LLM Call with Tools]
C --> D[Invoke Stock Info API]
D --> E[LLM Call with Results]
E --> F[Final Answer]
F --> G[Portfolio Manager Table]
classDef default fill:#f9f9f9,stroke:#666,stroke-width:1px,color:black;
classDef table fill:#b3e0ff,stroke:#0066cc,stroke-width:2px,color:black;
classDef llm fill:#ffcc99,stroke:#ff8000,stroke-width:2px,color:black;
classDef tool fill:#c2e0c2,stroke:#339933,stroke-width:2px,color:black;
classDef result fill:#ffffb3,stroke:#b3b300,stroke-width:2px,color:black;
class B,G table;
class C,E llm;
class D tool;
class F result;
```
### Key Benefits of Table UDFs
Break complex workflows into reusable components that can be tested and maintained separately.
Hide implementation details and expose only the necessary inputs and outputs through clean interfaces.
Combine multiple specialized agents to build more powerful workflows through function composition.
### Advanced Techniques
You can create a workflow of table UDFs to handle complex multi-stage processing:
```python
# Create a chain of specialized agents
research_agent = pxt.udf(research_table, return_value=research_table.findings)
analysis_agent = pxt.udf(analysis_table, return_value=analysis_table.insights)
report_agent = pxt.udf(report_table, return_value=report_table.document)
# Use them in sequence
workflow.add_computed_column(research=research_agent(workflow.query))
workflow.add_computed_column(analysis=analysis_agent(workflow.research))
workflow.add_computed_column(report=report_agent(workflow.analysis))
```
Execute multiple table UDFs in parallel and combine their results:
```python
# Define specialized agents for different tasks
stock_agent = pxt.udf(stock_table, return_value=stock_table.analysis)
news_agent = pxt.udf(news_table, return_value=news_table.summary)
sentiment_agent = pxt.udf(sentiment_table, return_value=sentiment_table.score)
# Process in parallel
portfolio.add_computed_column(stock_data=stock_agent(portfolio.ticker))
portfolio.add_computed_column(news_data=news_agent(portfolio.ticker))
portfolio.add_computed_column(sentiment=sentiment_agent(portfolio.ticker))
# Combine results
portfolio.add_computed_column(report=combine_insights(
portfolio.stock_data,
portfolio.news_data,
portfolio.sentiment
))
```
## 3. User-Defined Aggregates (UDAs)
### Overview
UDAs enable you to:
* Create custom aggregation functions
* Process multiple rows into a single result
* Use them in group\_by operations
* Build reusable aggregation logic
### Creating UDAs
```python
@pxt.uda
class sum_of_squares(pxt.Aggregator):
def __init__(self):
self.cur_sum = 0
def update(self, val: int) -> None:
self.cur_sum += val * val
def value(self) -> int:
return self.cur_sum
```
### UDA Components
1. **Initialization** (`__init__`)
* Sets up initial state
* Defines parameters
* Called once at start
2. **Update Method** (`update`)
* Processes each input row
* Updates internal state
* Must handle all value types
3. **Value Method** (`value`)
* Returns final result
* Called after all updates
* Performs final calculations
### Using UDAs
```python
# Basic usage
table.select(sum_of_squares(table.value)).collect()
# With grouping
table.group_by(table.category).select(
table.category,
sum_of_squares(table.value)
).collect()
```
### Best Practices for UDAs
* Manage state carefully
* Handle edge cases and errors
* Optimize for performance
* Use appropriate type hints
* Document expected behavior
## Additional Resources
Complete API reference
# Building Queries
Source: https://docs.pixeltable.com/docs/datastore/filtering-and-selecting
Learn how to query and transform data in Pixeltable using where() and select()
Learn more about queries and expressions with this [in-depth guide](https://github.com/pixeltable/pixeltable/blob/main/docs/notebooks/fundamentals/queries-and-expressions.ipynb).
## What are Queries?
Queries in Pixeltable allow you to filter, transform, and extract data from tables and views. Using Pixeltable's expressive query interface, you can build powerful data pipelines without writing complex SQL or using external transformation tools.
Pixeltable queries use a fluent API design where operations can be chained together to:
* Filter rows based on specific conditions using `where()`
* Select and transform columns using `select()`
* Sort results with `order_by()`
* Limit result sets with `limit()`
* Perform aggregations and calculations
Queries don't execute until you call `collect()`, making them efficient for complex operations. You can build queries incrementally, adding conditions and transformations as needed.
```python
# A basic query that filters, transforms, and sorts data
result = movies.where(
(movies.year >= 2000) & (movies.budget > 100.0)
).select(
movies.title,
roi=movies.revenue / movies.budget
).order_by(
'roi', asc=False
).limit(5).collect()
```
## Basic Filtering
This guide builds on tables created in previous sections. The `movies` table from [Tables](/docs/datastore/tables-and-operations)
Use `where()` to filter rows based on basic conditions:
```python
# Find movies with budget over $200M
movies.where(
movies.budget >= 200.0
).collect()
```
| title | year | budget |
| ----------------- | ---- | ------ |
| Titanic | 1997 | 200.0 |
| Avengers: Endgame | 2019 | 356.0 |
Use `select()` to choose specific columns:
```python
# Get titles and release years
movies.select(
movies.title,
movies.year
).collect()
```
| title | year |
| ----------------- | ---- |
| Jurassic Park | 1993 |
| Titanic | 1997 |
| Avengers: Endgame | 2019 |
| Inside Out 2 | 2024 |
Rename columns in your results:
```python
# Budget in hundreds of millions
movies.select(
movies.title,
budget_hundreds=movies.budget / 100
).collect()
```
| title | budget\_hundreds |
| ----------------- | ---------------- |
| Jurassic Park | 0.63 |
| Titanic | 2.0 |
| Avengers: Endgame | 3.56 |
| Inside Out 2 | 2.0 |
## Intermediate Queries
Work with string data in movie plots:
```python
# Find movies with "secret" in plot
movies.where(
movies.plot.contains('secret')
).collect()
# Find movies with "Park" in title
movies.where(
movies.title.contains('Park')
).collect()
```
Combine conditions with `&` (and), `|` (or):
```python
# Modern high-budget films
movies.where(
(movies.year >= 2000) &
(movies.budget >= 200.0)
).collect()
# Classics or low-budget films
movies.where(
(movies.year < 2000) |
(movies.budget < 100.0)
).collect()
```
Use `order_by()` to sort results:
```python
# Sort by budget (highest first)
movies.order_by(
movies.budget,
asc=False
).collect()
# Sort by year then budget
movies.order_by(
[movies.year, movies.budget],
asc=[True, False]
).collect()
```
## Advanced Queries
Analyze plot text and titles:
```python
# Calculate plot length statistics
movies.select(
movies.title,
plot_length=movies.plot.len()
).collect()
# Find movies with subtitles (colon in title)
movies.where(
movies.title.like('%: %')
).collect()
```
Budget calculations and comparisons:
```python
# Calculate budget statistics
movies.select(
avg_budget=movies.budget.avg(),
total_budget=movies.budget.sum(),
movie_count=movies.title.count()
).collect()
# Movies above average budget
avg_budget = movies.select(
movies.budget.avg()
).collect()[0][0]
movies.where(
movies.budget > avg_budget
).collect()
```
Combine multiple operations:
```python
# Top 3 highest-budget movies since 2000
movies.where(
movies.year >= 2000
).order_by(
movies.budget,
asc=False
).limit(3).collect()
# Analyze plots excluding specific keywords
movies.where(
~(movies.plot.contains('secret') |
movies.plot.contains('dream'))
).select(
movies.title,
plot_length=movies.plot.len()
).collect()
```
## Key Concepts
Access columns using dot notation (`movies.title`).
Combine `where()`, `select()`, `order_by()`, and `limit()` in any order.
Use `&` (and), `|` (or), and `~` (not) for complex conditions.
Transform data during selection with mathematical and string operations.
Build complex queries incrementally by starting with basic filters and adding operations one at a time. This makes debugging easier and helps ensure your query returns the expected results.
# Iterators
Source: https://docs.pixeltable.com/docs/datastore/iterators
Learn about iterators for processing documents, videos, audio, and images
## What are Iterators?
Iterators in Pixeltable are specialized tools for processing and transforming media content. They efficiently break down large files into manageable chunks, enabling analysis at different granularities. Iterators work seamlessly with views to create virtual derived tables without duplicating storage.
In Pixeltable, iterators:
* Process media files incrementally to manage memory efficiently
* Transform single records into multiple output records
* Support various media types including documents, videos, images, and audio
* Integrate with the view system for automated processing pipelines
* Provide configurable parameters for fine-tuning output
Iterators are particularly useful when:
* Working with large media files that can't be processed at once
* Building retrieval systems that require chunked content
* Creating analysis pipelines for multimedia data
* Implementing feature extraction workflows
```python
import pixeltable as pxt
from pixeltable.iterators import DocumentSplitter
# Create a view using an iterator
chunks = pxt.create_view(
'docs.chunks',
documents_table,
iterator=DocumentSplitter.create(
document=documents_table.document,
separators='paragraph'
)
)
```
## Core Concepts
Split documents into chunks by headings, paragraphs, or sentences
Extract frames at specified intervals or counts
Divide images into overlapping or non-overlapping tiles
Split audio files into time-based chunks with configurable overlap
Iterators are powerful tools for processing large media files. They work seamlessly with Pixeltable's computed columns and versioning system.
## Available Iterators
```python
from pixeltable.iterators import DocumentSplitter
# Create view with document chunks
chunks_view = pxt.create_view(
'docs.chunks',
docs_table,
iterator=DocumentSplitter.create(
document=docs_table.document,
separators='paragraph,token_limit',
limit=500,
metadata='title,heading'
)
)
```
### Parameters
* `separators`: Choose from 'heading', 'paragraph', 'sentence', 'token\_limit', 'char\_limit', 'page'
* `limit`: Maximum tokens/characters per chunk
* `metadata`: Optional fields like 'title', 'heading', 'sourceline', 'page', 'bounding\_box'
* `overlap`: Optional overlap between chunks
```python
from pixeltable.iterators import FrameIterator
# Extract frames at 1 FPS
frames_view = pxt.create_view(
'videos.frames',
videos_table,
iterator=FrameIterator.create(
video=videos_table.video,
fps=1.0
)
)
# Extract exact number of frames
frames_view = pxt.create_view(
'videos.keyframes',
videos_table,
iterator=FrameIterator.create(
video=videos_table.video,
num_frames=10 # Extract 10 evenly-spaced frames
)
)
```
### Parameters
* `fps`: Frames per second to extract (can be fractional)
* `num_frames`: Exact number of frames to extract
* Only one of `fps` or `num_frames` can be specified
```python
from pixeltable.iterators import TileIterator
# Create tiles with overlap
tiles_view = pxt.create_view(
'images.tiles',
images_table,
iterator=TileIterator.create(
image=images_table.image,
tile_size=(224, 224), # Width, Height
overlap=(32, 32) # Horizontal, Vertical overlap
)
)
```
### Parameters
* `tile_size`: Tuple of (width, height) for each tile
* `overlap`: Optional tuple for overlap between tiles
```python
from pixeltable.iterators import AudioSplitter
# Split audio into chunks
chunks_view = pxt.create_view(
'audio.chunks',
audio_table,
iterator=AudioSplitter.create(
audio=audio_table.audio,
chunk_duration_sec=30.0, # Split into 30-second chunks
overlap_sec=2.0, # 2-second overlap between chunks
min_chunk_duration_sec=5.0 # Drop last chunk if < 5 seconds
)
)
```
### Parameters
* `chunk_duration_sec` (float): Duration of each audio chunk in seconds
* `overlap_sec` (float, default: 0.0): Overlap duration between consecutive chunks in seconds
* `min_chunk_duration_sec` (float, default: 0.0): Minimum duration threshold - the last chunk will be dropped if it's shorter than this value
### Returns
For each chunk, yields:
* `start_time_sec`: Start time of the chunk in seconds
* `end_time_sec`: End time of the chunk in seconds
* `audio_chunk`: The audio chunk as pxt.Audio type
### Notes
* If the input contains no audio, no chunks are yielded
* The audio file is processed efficiently with proper codec handling
* Supports various audio formats including MP3, AAC, Vorbis, Opus, FLAC
## Common Use Cases
Split documents for:
* RAG systems
* Text analysis
* Content extraction
Extract frames for:
* Object detection
* Scene classification
* Activity recognition
Create tiles for:
* High-resolution analysis
* Object detection
* Segmentation tasks
Split audio for:
* Speech recognition
* Sound classification
* Audio feature extraction
## Example Workflows
```python
# Create document chunks
chunks = pxt.create_view(
'rag.chunks',
docs_table,
iterator=DocumentSplitter.create(
document=docs_table.document,
separators='paragraph',
limit=500
)
)
# Add embeddings
chunks.add_embedding_index(
'text',
string_embed=sentence_transformer.using(
model_id='all-mpnet-base-v2'
)
)
```
```python
# Extract frames at 1 FPS
frames = pxt.create_view(
'detection.frames',
videos_table,
iterator=FrameIterator.create(
video=videos_table.video,
fps=1.0
)
)
# Add object detection
frames.add_computed_column(detections=detect_objects(frames.frame))
```
```python
# Split long audio files
chunks = pxt.create_view(
'audio.chunks',
audio_table,
iterator=AudioSplitter.create(
audio=audio_table.audio,
chunk_duration_sec=30.0
)
)
# Add transcription
chunks.add_computed_column(text=whisper_transcribe(chunks.audio_chunk))
```
## Best Practices
* Use appropriate chunk sizes
* Consider overlap requirements
* Monitor memory usage with large files
* Balance chunk size vs. processing time
* Use batch processing when possible
* Cache intermediate results
## Tips & Tricks
When using `token_limit` with DocumentSplitter, ensure the limit accounts for any model context windows in your pipeline.
## Additional Resources
Complete iterator documentation
Sample applications
Step-by-step guides
# Tables
Source: https://docs.pixeltable.com/docs/datastore/tables-and-operations
Learn the fundamentals of Pixeltable tables, types, and how to build in Pixeltable
Learn more about Pixeltable tables and the data operations with our [in-depth guide](https://github.com/pixeltable/pixeltable/blob/main/docs/notebooks/fundamentals/tables-and-data-operations.ipynb).
## What are Tables?
Tables are the fundamental data storage units in Pixeltable. They function similarly to SQL database tables but with enhanced capabilities designed specifically for AI and ML workflows. Each table consists of columns with defined data types and can store both structured data and unstructured media assets.
In Pixeltable, tables:
* Persist across sessions, meaning your data remains available even after restarting your environment
* Maintain strong typing for data consistency
* Support operations like filtering, querying, and transformation
* Can handle specialized data types for machine learning and media processing
* Group logically into directories (namespaces) for organization
Creating a table requires defining a name and schema that describes its structure:
```python
import pixeltable as pxt
# Create a directory to organize tables
pxt.create_dir('example')
# Create a table with a defined schema
films = pxt.create_table('example.films', {
'title': pxt.String,
'year': pxt.Int,
'revenue': pxt.Float
})
```
## Type System
```python
# Schema definition
table = pxt.create_table('example', {
'text': pxt.String, # Text data
'count': pxt.Int, # Integer numbers
'score': pxt.Float, # Decimal numbers
'active': pxt.Bool, # Boolean values
'created': pxt.Timestamp # Date/time values
})
```
```python
# Media handling
media = pxt.create_table('media', {
'image': pxt.Image[(224, 224), 'RGB'], # With size & mode
'video': pxt.Video, # Video reference
'audio': pxt.Audio, # Audio file
'document': pxt.Document # PDF/text doc
})
```
```python
# ML-specific types
ml_data = pxt.create_table('ml_features', {
'embedding': pxt.Array[(768,), pxt.Float], # Fixed-size array
'features': pxt.Array[(None, 512)], # Variable first dim
'metadata': pxt.Json # Flexible JSON data
})
```
## Column Casting
Pixeltable allows you to explicitly cast column values to ensure they conform to the expected type. This is particularly useful when working with computed columns or transforming data from external sources.
```python
# Cast columns to different types
table.update({
'int_score': table.score.astype(pxt.Int), # Cast float to integer
'string_count': table.count.astype(pxt.String), # Cast integer to string
})
# Using casting in computed columns
films.add_computed_column(
budget_category=films.budget.astype(pxt.String) + ' million'
)
# Casting in expressions
films.where(films.revenue.astype(pxt.Int) > 100).collect()
```
Column casting helps maintain data consistency and prevents type errors when processing your data.
## Data Operations
Filter and retrieve data:
```python
# Basic row count
films.count() # Returns total number of rows
# Basic filtering
films.where(films.budget >= 200.0).collect()
# Select specific columns
films.select(films.title, films.year).collect()
# Limit results
films.limit(5).collect() # First 5 rows (no specific order)
films.head(5) # First 5 rows by insertion order
films.tail(5) # Last 5 rows by insertion order
# Order results
films.order_by(films.budget, asc=False).limit(5).collect()
```
Manipulate text data:
```python
# String contains
films.where(films.title.contains('Inception')).collect()
# String replacement
films.update({
'plot': films.plot.replace('corporate secrets', 'subconscious secrets')
})
# String functions
films.update({
'title': films.title.upper(), # Convert to uppercase
'length': films.title.len() # Get string length
})
```
Add new data:
```python
# Insert single row
films.insert(
title='Inside Out 2',
year=2024,
plot='Emotions navigate puberty',
budget=200.0
)
# Insert multiple rows
films.insert([
{
'title': 'Jurassic Park',
'year': 1993,
'plot': 'Dinosaur theme park disaster',
'budget': 63.0
},
{
'title': 'Titanic',
'year': 1997,
'plot': 'Ill-fated ocean liner romance',
'budget': 200.0
}
])
```
Modify existing data:
```python
# Update all rows
films.update({
'budget': films.budget * 1.1 # Increase all budgets by 10%
})
# Conditional updates
films.where(
films.year < 2000
).update({
'plot': films.plot + ' (Classic Film)'
})
# Batch updates for multiple rows
updates = [
{'id': 1, 'budget': 175.0},
{'id': 2, 'budget': 185.0}
]
films.batch_update(updates)
```
Remove data with conditions:
```python
# Delete specific rows
films.where(
films.year < 1995
).delete()
# Delete with complex conditions
films.where(
(films.budget < 100.0) &
(films.year < 2000)
).delete()
# WARNING: Delete all rows (use with caution!)
# films.delete() # Without where clause deletes all rows
```
Manage table structure:
```python
# Add new column
films.add_column(rating=pxt.String)
# Drop column
films.drop_column('rating')
# View schema
films.describe()
```
Manage table versions:
```python
# Revert the last operation
films.revert() # Cannot be undone!
# Revert multiple times to go back further
films.revert()
films.revert() # Goes back two operations
```
Extract data for analysis:
```python
# Get results as Python objects
result = films.limit(5).collect()
first_row = result[0] # Get first row as dict
timestamps = result['timestamp'] # Get list of values for one column
# Convert to Pandas
df = result
df['revenue'].describe() # Get statistics for revenue column
```
Combine data from multiple tables using different join types.
```python
import pixeltable as pxt
# Define the customers table
customers = pxt.create_table(
"customers",
{"customer_id": pxt.Int, "name": pxt.String, "total_spent": pxt.Float},
if_exists="replace",
)
# Define the orders table
orders = pxt.create_table(
"orders",
{"order_id": pxt.Int, "customer_id": pxt.Int, "amount": pxt.Float},
if_exists="replace",
)
# Populate the tables with sample data
customers.insert([
{'customer_id': 1, 'name': 'Alice Johnson', 'total_spent': 250.0},
{'customer_id': 2, 'name': 'Bob Smith', 'total_spent': 180.0},
{'customer_id': 3, 'name': 'Carol White', 'total_spent': 320.0},
{'customer_id': 4, 'name': 'David Brown', 'total_spent': 150.0},
{'customer_id': 5, 'name': 'Eve Davis', 'total_spent': 90.0}
])
orders.insert([
{'order_id': 101, 'customer_id': 1, 'amount': 75.0},
{'order_id': 102, 'customer_id': 1, 'amount': 30.0},
{'order_id': 103, 'customer_id': 2, 'amount': 120.0},
{'order_id': 104, 'customer_id': 4, 'amount': 60.0}
])
```
### Inner Join
Returns only matching records from both tables.
```python
inner_join_result = customers.join(
orders,
on=customers.customer_id == orders.customer_id,
how='inner'
).select(
customers.name,
orders.amount
)
inner_df = inner_join_result.collect()
print(inner_df)
# Output will show only customers with matching orders (customer_id 1, 2, 4)
```
### Left Outer Join
Returns all records from the left table and matching records from the right table.
```python
left_join_result = customers.join(
orders,
on=customers.customer_id == orders.customer_id,
how='left'
).select(
customers.name,
orders.amount
)
left_df = left_join_result.collect()
print(left_df)
# Output will show all customers (1-5), with null for amount where no order exists
```
### Right Outer Join
Returns all records from the right table and matching records from the left table.
```python
right_join_result = customers.join(
orders,
on=customers.customer_id == orders.customer_id,
how='right'
).select(
customers.name,
orders.amount
)
right_df = right_join_result.collect()
print(right_df)
# Output will show all orders (order_id 101-104), with null for name where no customer exists
```
### Cross Join
Returns all possible combinations of records from both tables.
```python
cross_join_result = customers.join(
orders,
how='cross'
).select(
customers.name,
orders.amount
)
cross_df = cross_join_result.collect()
print(cross_df)
# Output will show 5 customers x 4 orders = 20 combinations
```
## Best Practices
* Use clear naming for directories and tables
* Document computed column dependencies
* Use `get_table()` to fetch existing tables
* Use batch operations for multiple rows
## Common Patterns
1. Create `table.py` for structure
2. Test schema and workflow
3. Create `app.py` for usage
4. Deploy both files
```python
# table.py - Run once to set up
pxt.create_table(..., if_exists="ignore")
# app.py - Production code
table = pxt.get_table("myapp.mytable")
if table is None:
raise RuntimeError("Run table.py first!")
```
## Additional Resources
Complete API reference
Sample workflows
Quick reference
Remember that Pixeltable automatically handles versioning and lineage tracking. Every operation is recorded and can be reverted if needed.
# Vector Database
Source: https://docs.pixeltable.com/docs/datastore/vector-database
Learn how to create, populate and query embedding indexes in Pixeltable
Learn more about embedding/vector indexes with this [in-depth guide](https://github.com/pixeltable/pixeltable/blob/main/docs/notebooks/feature-guides/embedding-indexes.ipynb).
## What are Embedding/Vector Indexes?
Embedding indexes let you search your data based on meaning, not just keywords. They work with all kinds of content - text, images, audio, video, and documents - making it easy to build powerful search systems.
### Multimodal Search Examples
Pixeltable makes it easy to build semantic search for different media types:
Build semantic search for audio files and podcasts
Create visual search engines with embedding models
Search through PDFs and other document formats
Find relevant content within video libraries
Search across web content with semantic understanding
Use metadata to search for long term memory for ai agents
## How Pixeltable Makes Embeddings Easy
* **No infrastructure headaches** - embeddings are managed automatically
* **Works with any media type** - text, images, audio, video, or documents
* **Updates automatically** - when data changes, embeddings update too
* **Compatible with your favorite models** - use Hugging Face, OpenAI, or your custom models
## Phase 1: Setup Embeddings Model and Index
The setup phase defines your schema and creates embedding indexes.
```bash
pip install pixeltable sentence-transformers
```
```python
import pixeltable as pxt
from pixeltable.functions.huggingface import sentence_transformer
# Create a directory to organize data (optional)
pxt.drop_dir('knowledge_base', force=True)
pxt.create_dir('knowledge_base')
# Create table
docs = pxt.create_table(
"knowledge_base.documents",
{
"content": pxt.String,
"metadata": pxt.Json
}
)
# Create embedding index
embed_model = sentence_transformer.using(
model_id="intfloat/e5-large-v2"
)
docs.add_embedding_index(
column='content',
string_embed=embed_model
)
```
```bash
pip install pixeltable openai
```
```python
import pixeltable as pxt
from pixeltable.functions.openai import embeddings
# Create a directory to organize data (optional)
pxt.drop_dir('knowledge_base', force=True)
pxt.create_dir('knowledge_base')
# Create table
docs = pxt.create_table(
"knowledge_base.documents",
{
"content": pxt.String,
"metadata": pxt.Json
}
)
# Create embedding index
embed_model = embeddings.using(model_id="text-embedding-3-small")
docs.add_embedding_index(
column='content',
embedding=embed_model
)
```
```python
import tensorflow as tf
import tensorflow_hub as hub
import tensorflow_text
@pxt.udf
def bert(input: str) -> pxt.Array[(512,), pxt.Float]:
"""Computes text embeddings using small_bert."""
preprocessor = hub.load(
'https://tfhub.dev/tensorflow/bert_en_uncased_preprocess/3'
)
bert_model = hub.load(
'https://tfhub.dev/tensorflow/small_bert/bert_en_uncased_L-4_H-512_A-8/2'
)
tensor = tf.constant([input])
result = bert_model(preprocessor(tensor))['pooled_output']
return result.numpy()[0, :]
# Add custom embedding index
docs.add_embedding_index(
column='content',
idx_name='bert_idx',
string_embed=bert
)
```
### Supported Index Options
```python
# Available metrics:
docs.add_embedding_index(
column='content',
metric='cosine' # Default
# Other options:
# metric='ip' # Inner product
# metric='l2' # L2 distance
)
```
```python
# Optional parameters
docs.add_embedding_index(
column='content',
idx_name='custom_name', # Optional name
string_embed=embed_model,
image_embed=img_model, # For image columns
)
```
## Phase 2: Insert
The insert phase populates your indexes with data. Pixeltable automatically computes embeddings and maintains index consistency.
```python
# Single insertion
docs.insert([
{
"content": "Your document text here",
"metadata": {"source": "web", "category": "tech"}
}
])
# Batch insertion
docs.insert([
{
"content": "First document",
"metadata": {"source": "pdf", "category": "science"}
},
{
"content": "Second document",
"metadata": {"source": "web", "category": "news"}
}
])
# Image insertion
image_urls = [
'https://example.com/image1.jpg',
'https://example.com/image2.jpg'
]
images.insert({'image': url} for url in image_urls)
```
Large batch insertions are more efficient than multiple single insertions as they reduce the number of embedding computations.
## Phase 3: Query
The query phase allows you to search your indexed content using the `similarity()` function.
```python
sim = docs.content.similarity("what is the documentation")
# Return top-k most similar documents
results = (docs.order_by(sim, asc=False)
.select(docs.content, docs.metadata, score=sim)
.limit(10)
)
for i in results:
print(f"Similarity: {i['score']:.3f}")
print(f"Text: {i['content']}\n")
```
```python
@pxt.query
def filtered_search(query: str, category: str):
sim = docs.content.similarity(query)
return (
docs
.where(docs.metadata['category'] == category)
.order_by(sim, asc=False)
.select(docs.content, score=sim)
.limit(5)
)
docs.add_computed_column(
filtered_search(docs.content, docs.category)
)
```
## Management Operations
```python
# Drop by name
docs.drop_embedding_index(idx_name='e5_idx')
# Drop by column (if single index)
docs.drop_embedding_index(column='content')
```
```python
# Indexes auto-update on changes
docs.update({
'content': docs.content + ' Updated!'
})
```
## Best Practices
* Cache embedding models in production UDFs
* Use batching for better performance
* Consider index size vs. search speed tradeoffs
* Monitor embedding computation time
## Additional Resources
Complete API reference
Examples of multimodal embedding indexes
Connect with your favorite Hugging Face models
# Views
Source: https://docs.pixeltable.com/docs/datastore/views
Learn how to create and use virtual derived tables in Pixeltable through views
# When to Use Views
Views in Pixeltable are best used when you need to:
1. **Transform Data**: When you need to process or reshape data from a base table (e.g., splitting documents into chunks, extracting features from images)
2. **Filter Data**: When you frequently need to work with a specific subset of your data
3. **Create Virtual Tables**: When you want to avoid storing redundant data and automatically keep derived data in sync
4. **Build Data Workflows**: When you need to chain multiple data transformations together
5. **Save Storage**: When you want to compute data on demand rather than storing it permanently
Choose views over tables when your data is derived from other base tables and needs to stay synchronized with its source. Use regular tables when you need to store original data or when the computation cost of deriving data on demand is too high.
## Phase 1: Define your base table and view structure
```python
import pixeltable as pxt
from pixeltable.iterators import DocumentSplitter
# Create a directory to organize data (optional)
pxt.drop_dir('documents', force=True)
pxt.create_dir('documents')
# Define your base table first
documents = pxt.create_table(
"documents.collection",
{"document": pxt.Document}
)
# Create a view that splits documents into chunks
chunks = pxt.create_view(
'documents.chunks',
documents,
iterator=DocumentSplitter.create(
document=documents.document,
separators='token_limit',
limit=300
)
)
```
## Phase 2: Use your application
```python
import pixeltable as pxt
# Connect to your base table and view
documents = pxt.get_table("documents.collection")
chunks = pxt.get_table("documents.chunks")
# Insert data into base table - view updates automatically
documents.insert([{
"document": "path/to/document.pdf"
}])
# Query the view
print(chunks.collect())
```
## View Types
Views created using iterators to transform data:
```python
# Document splitting view
chunks = pxt.create_view(
'docs.chunks',
documents,
iterator=DocumentSplitter.create(
document=documents.document
)
)
```
Views created from query operations:
```python
# Filtered view of high-budget movies
blockbusters = pxt.create_view(
'movies.blockbusters',
movies.where(movies.budget >= 100.0)
)
```
## View Operations
Query views like regular tables:
```python
# Basic filtering on view
chunks.where(chunks.text.contains('specific topic')).collect()
# Select specific columns
chunks.select(chunks.text, chunks.pos).collect()
# Order results
chunks.order_by(chunks.pos).limit(5).collect()
```
Add computed columns to views:
```python
# Add embeddings to chunks
chunks.add_computed_column(
embedding=sentence_transformer.using(
model_id='intfloat/e5-large-v2'
)(chunks.text)
)
```
Create views based on other views:
```python
# Create a view of embedded chunks
embedded_chunks = pxt.create_view(
'docs.embedded_chunks',
chunks.where(chunks.text.len() > 100)
)
```
## Key Features
Views automatically update when base tables change
Views compute data on demand, saving storage
Views can be part of larger data workflows
## Additional Resources
Complete API reference
Sample view implementations
Build a RAG system using views
# Evaluations
Source: https://docs.pixeltable.com/docs/examples/chat/evals
Add automated quality assessment to your AI applications using LLM-based evaluation
# LLM Judge
Learn how to add automated quality assessment to your AI applications using LLM-based evaluation. The judge works in two phases:
1. Define your evaluation structure and criteria
2. Use the judge to assess AI responses
```bash
pip install pixeltable openai
```
Create `table.py`:
```python
import pixeltable as pxt
from pixeltable.functions import openai
# Initialize app structure
pxt.drop_dir("evaluations", force=True)
pxt.create_dir("evaluations")
# Define data schema with evaluation criteria
conversations = pxt.create_table(
"evaluations.conversations",
{
"prompt": pxt.String,
"expected_criteria": pxt.String
},
if_exists="ignore"
)
# Configure processing workflow
conversations.add_computed_column(
messages=[{"role": "user", "content": conversations.prompt}]
)
conversations.add_computed_column(
response=openai.chat_completions(
messages=conversations.messages,
model="gpt-4o-mini",
)
)
conversations.add_computed_column(
answer=conversations.response.choices[0].message.content
)
# Add judge evaluation workflow
judge_prompt_template = """
You are an expert judge evaluating AI responses. Your task is to evaluate the following response based on the given criteria.
Original Prompt: {prompt}
Expected Criteria: {criteria}
AI Response: {response}
Please evaluate the response on a scale of 1-10 and provide a brief explanation.
Format your response as:
Score: [1-10]
Explanation: [Your explanation]
"""
conversations.add_computed_column(
judge_prompt=judge_prompt_template.format(
prompt=conversations.prompt,
criteria=conversations.expected_criteria,
response=conversations.answer
)
)
conversations.add_computed_column(
judge_response=openai.chat_completions(
messages=[
{"role": "system", "content": "You are an expert judge evaluating AI responses."},
{"role": "user", "content": conversations.judge_prompt}
],
model="gpt-4o-mini",
)
)
conversations.add_computed_column(
evaluation=conversations.judge_response.choices[0].message.content
)
# Add score extraction
@pxt.udf
def extract_score(evaluation: str) -> float:
try:
score_line = [line for line in evaluation.split('\n') if line.startswith('Score:')][0]
return float(score_line.split(':')[1].strip())
except:
return 0.0
conversations.add_computed_column(
score=extract_score(conversations.evaluation)
)
```
Create `app.py`:
```python
import pixeltable as pxt
def run_evaluation():
# Connect to your app
conversations = pxt.get_table("evaluations.conversations")
# Example prompts with evaluation criteria
test_cases = [
{
"prompt": "Write a haiku about dogs.",
"expected_criteria": """
The response should:
1) Follow 5-7-5 syllable pattern
2) Be about dogs
3) Use vivid imagery
"""
},
{
"prompt": "Explain quantum computing to a 10-year-old.",
"expected_criteria": """
The response should:
1) Use age-appropriate language
2) Use relevant analogies
3) Be engaging and clear
"""
}
]
# Insert test cases
conversations.insert(test_cases)
# Get results with evaluations
results = conversations.select(
conversations.prompt,
conversations.answer,
conversations.evaluation,
conversations.score
).collect().to_pandas()
# Print results
for idx, row in results.iterrows():
print(f"\nTest Case {idx + 1}")
print("=" * 50)
print(f"Prompt: {row['prompt']}")
print(f"\nResponse: {row['answer']}")
print(f"\nEvaluation:\n{row['evaluation']}")
print(f"Score: {row['score']}")
print("=" * 50)
if __name__ == "__main__":
run_evaluation()
```
## Key Features
Define specific criteria for each prompt to ensure consistent evaluation standards
Get quantitative scores (1-10) along with qualitative feedback
Receive detailed explanations for each evaluation score
Automatically store all evaluations for analysis and tracking
## Customization Options
Customize the evaluation criteria based on your needs:
```python
test_case = {
"prompt": "Your prompt here",
"expected_criteria": """
The response should:
1) [Your first criterion]
2) [Your second criterion]
3) [Your third criterion]
"""
}
```
Modify the scoring system by updating the judge prompt template:
```python
judge_prompt_template = """
... [Your custom evaluation instructions] ...
Please evaluate on a scale of [your scale] based on:
- [Criterion 1]
- [Criterion 2]
Format:
Score: [score]
Explanation: [details]
"""
```
Choose different models for response generation and evaluation:
```python
conversations.add_computed_column(
judge_response=openai.chat_completions(
messages=messages,
model="your-chosen-model" # Change model here
)
)
```
## Best Practices
1. **Clear Criteria**: Define specific, measurable criteria for each prompt
2. **Consistent Scale**: Use a consistent scoring scale across all evaluations
3. **Detailed Feedback**: Request specific explanations for scores
4. **Regular Monitoring**: Track scores over time to identify patterns
5. **Iterative Improvement**: Use feedback to refine prompts and criteria
# Memory
Source: https://docs.pixeltable.com/docs/examples/chat/memory
Build a chatbot that remembers conversation history using Pixeltable
# Building a Memory-Enabled Chatbot
Learn how to build a chatbot that remembers conversation history using Pixeltable. Works in two phases:
1. Define your app structure (once)
2. Use your app (anytime)
```bash
pip install pixeltable
```
Create `tables.py`:
```python
import pixeltable as pxt
from datetime import datetime
from typing import List, Dict
# Initialize app structure
pxt.drop_dir("chatbot", force=True)
pxt.create_dir("chatbot")
# Create memory table
memory = pxt.create_table(
"chatbot.memory",
{
"role": pxt.String,
"content": pxt.String,
"timestamp": pxt.Timestamp,
},
if_exists="ignore",
)
# Create chat session table
chat_session = pxt.create_table(
"chatbot.chat_session",
{"user_message": pxt.String, "timestamp": pxt.Timestamp},
if_exists="ignore",
)
# Define memory retrieval
@pxt.query
def get_recent_memory():
return (
memory.order_by(memory.timestamp, asc=False)
.select(role=memory.role, content=memory.content)
.limit(10)
)
# Define message creation
@pxt.udf
def create_messages(past_context: List[Dict], current_message: str) -> List[Dict]:
messages = [
{
"role": "system",
"content": "You are a chatbot with memory capabilities.",
}
]
messages.extend(
[{"role": msg["role"], "content": msg["content"]} for msg in past_context]
)
messages.append({"role": "user", "content": current_message})
return messages
# Configure processing workflow
chat_session.add_computed_column(memory_context=get_recent_memory())
chat_session.add_computed_column(
prompt=create_messages(chat_session.memory_context, chat_session.user_message)
)
chat_session.add_computed_column(
llm_response=pxt.functions.openai.chat_completions(
messages=chat_session.prompt,
model="gpt-4o-mini"
)
)
chat_session.add_computed_column(
assistant_response=chat_session.llm_response.choices[0].message.content
)
```
Create `app.py`:
```python
import pixeltable as pxt
from datetime import datetime
# Connect to your app
memory = pxt.get_table("chatbot.memory")
chat_session = pxt.get_table("chatbot.chat_session")
def chat(message: str) -> str:
"""Process a message through the memory-enabled chatbot"""
# Store user message
memory.insert([{
"role": "user",
"content": message,
"timestamp": datetime.now()
}])
# Process through chat session
chat_session.insert([{
"user_message": message,
"timestamp": datetime.now()
}])
# Get response
result = chat_session.select(
chat_session.assistant_response
).where(
chat_session.user_message == message
).collect()
response = result["assistant_response"][0]
# Store assistant response
memory.insert([{
"role": "assistant",
"content": response,
"timestamp": datetime.now()
}])
return response
# Use it!
responses = [
chat("Hi! My name is Alice."),
chat("What's the weather like today?"),
chat("Can you remember my name?"),
]
# Print responses
for i, response in enumerate(responses, 1):
print(f"\nExchange {i}:")
print(f"Bot: {response}")
```
# Multimodal Chatbot
Source: https://docs.pixeltable.com/docs/examples/chat/multimodal
Build a chat application that processes documents, videos, and audio
# Building a Multimodal Chat Application
Learn how to build a production-ready chat application that can process and understand multiple types of media using Pixeltable.
See the complete [example on GitHub](https://github.com/pixeltable/pixeltable/tree/main/docs/sample-apps/multimodal-chat).
## Table Structure and Types
First, define your core data structure:
```python
import pixeltable as pxt
from pixeltable.functions import openai
from pixeltable.functions.huggingface import sentence_transformer
from pixeltable.functions.video import extract_audio
from pixeltable.iterators import DocumentSplitter
from pixeltable.iterators.string import StringSplitter
# Create a directory to organize data (optional)
pxt.drop_dir("chatbot", force=True)
pxt.create_dir("chatbot")
# Define core tables
docs_table = pxt.create_table(
"chatbot.documents",
{
"document": pxt.Document, # For text documents
"video": pxt.Video, # For video files
"audio": pxt.Audio, # For audio files
"question": pxt.String, # User queries
}
)
conversations = pxt.create_table(
"chatbot.conversations",
{
"role": pxt.String, # 'user' or 'assistant'
"content": pxt.String, # Message content
"timestamp": pxt.Timestamp # Message timestamp
}
)
```
## Views and Chunking
Create specialized views for processing different media types:
```python
# Document chunks view
chunks_view = pxt.create_view(
"chatbot.chunks",
docs_table,
iterator=DocumentSplitter.create(
document=docs_table.document,
separators="sentence",
metadata="title,heading,sourceline",
)
)
# Video transcription chunks
transcription_chunks = pxt.create_view(
"chatbot.transcription_chunks",
docs_table,
iterator=StringSplitter.create(
text=docs_table.transcription_text,
separators="sentence"
)
)
# Audio transcription chunks
audio_chunks = pxt.create_view(
"chatbot.audio_chunks",
docs_table,
iterator=StringSplitter.create(
text=docs_table.audio_transcription_text,
separators="sentence"
)
)
```
## User-Defined Functions (UDFs)
Define custom functions for processing:
```python
@conversations.query
def get_chat_history():
"""Retrieve chat history in chronological order"""
return conversations.order_by(
conversations.timestamp
).select(
role=conversations.role,
content=conversations.content
)
@pxt.udf
def create_messages(history: list[dict], prompt: str) -> list[dict]:
"""Create message list for chat completion"""
messages = [{
'role': 'system',
'content': 'You are a helpful AI assistant maintaining conversation context.'
}]
# Add historical messages
messages.extend({
'role': msg['role'],
'content': msg['content']
} for msg in history)
# Add current prompt
messages.append({
'role': 'user',
'content': prompt
})
return messages
@pxt.udf
def create_prompt(
doc_context: list[dict],
video_context: list[dict],
audio_context: list[dict],
question: str
) -> str:
"""Create a unified prompt from multiple context sources"""
context_parts = []
if doc_context:
context_parts.append(
"Document Context:\n" + "\n\n".join(
item["text"] for item in doc_context if item and "text" in item
)
)
if video_context:
context_parts.append(
"Video Context:\n" + "\n\n".join(
item["text"] for item in video_context if item and "text" in item
)
)
if audio_context:
context_parts.append(
"Audio Context:\n" + "\n\n".join(
item["text"] for item in audio_context if item and "text" in item
)
)
full_context = "\n\n---\n\n".join(context_parts) if context_parts else "No relevant context found."
return f"Context:\n{full_context}\n\nQuestion:\n{question}"
```
## Search and Filtering
Set up semantic search capabilities:
```python
# Add embedding indexes for semantic search
chunks_view.add_embedding_index(
"text",
string_embed=sentence_transformer.using(model_id="intfloat/e5-large-v2")
)
transcription_chunks.add_embedding_index(
"text",
string_embed=sentence_transformer.using(model_id="intfloat/e5-large-v2")
)
audio_chunks.add_embedding_index(
"text",
string_embed=sentence_transformer.using(model_id="intfloat/e5-large-v2")
)
# Define search queries
@chunks_view.query
def get_relevant_chunks(query_text: str):
"""Find relevant document chunks"""
sim = chunks_view.text.similarity(query_text)
return (
chunks_view.order_by(sim, asc=False)
.select(chunks_view.text, sim=sim)
.limit(20)
)
@transcription_chunks.query
def get_relevant_transcript_chunks(query_text: str):
"""Find relevant video transcript chunks"""
sim = transcription_chunks.text.similarity(query_text)
return (
transcription_chunks.order_by(sim, asc=False)
.select(transcription_chunks.text, sim=sim)
.limit(20)
)
@audio_chunks.query
def get_relevant_audio_chunks(query_text: str):
"""Find relevant audio transcript chunks"""
sim = audio_chunks.text.similarity(query_text)
return (
audio_chunks.order_by(sim, asc=False)
.select(audio_chunks.text, sim=sim)
.limit(20)
)
```
## Computed Columns
Define your processing workflow with computed columns:
```python
# Video processing workflow
docs_table.add_computed_column(
audio_extract=extract_audio(docs_table.video, format="mp3")
)
docs_table.add_computed_column(
transcription=openai.transcriptions(
audio=docs_table.audio_extract,
model="whisper-1"
)
)
docs_table.add_computed_column(
transcription_text=docs_table.transcription.text
)
# Audio processing workflow
docs_table.add_computed_column(
audio_transcription=openai.transcriptions(
audio=docs_table.audio,
model="whisper-1"
)
)
docs_table.add_computed_column(
audio_transcription_text=docs_table.audio_transcription.text
)
# Chat processing workflow
docs_table.add_computed_column(
context_doc=chunks_view.queries.get_relevant_chunks(docs_table.question)
)
docs_table.add_computed_column(
context_video=transcription_chunks.queries.get_relevant_transcript_chunks(docs_table.question)
)
docs_table.add_computed_column(
context_audio=audio_chunks.queries.get_relevant_audio_chunks(docs_table.question)
)
docs_table.add_computed_column(
prompt=create_prompt(
docs_table.context_doc,
docs_table.context_video,
docs_table.context_audio,
docs_table.question
)
)
docs_table.add_computed_column(
chat_history=conversations.queries.get_chat_history()
)
docs_table.add_computed_column(
messages=create_messages(
docs_table.chat_history,
docs_table.prompt
)
)
docs_table.add_computed_column(
response=openai.chat_completions(
messages=docs_table.messages,
model="gpt-4o-mini"
)
)
docs_table.add_computed_column(
answer=docs_table.response.choices[0].message.content
)
```
## Usage Example
Here's how to use the application:
```python
import pixeltable as pxt
from datetime import datetime
# Connect to your app
docs_table = pxt.get_table("chatbot.documents")
conversations = pxt.get_table("chatbot.conversations")
# Add a document
docs_table.insert([{
"document": "path/to/document.pdf"
}])
# Add a video
docs_table.insert([{
"video": "path/to/video.mp4"
}])
# Ask a question
question = "What are the key points from all sources?"
# Store user message
conversations.insert([{
"role": "user",
"content": question,
"timestamp": datetime.now()
}])
# Get answer
docs_table.insert([{"question": question}])
result = docs_table.select(docs_table.answer).collect()
answer = result["answer"][0]
# Store assistant response
conversations.insert([{
"role": "assistant",
"content": answer,
"timestamp": datetime.now()
}])
# View conversation history
history = conversations.collect().to_pandas()
print(history)
```
## Best Practices
* Keep table schemas focused and specific
* Use appropriate column types
* Document schema dependencies
* Group related computations
* Consider computation cost
* Monitor workflow performance
* Keep functions single-purpose
* Add clear documentation
* Handle edge cases
* Choose appropriate embedding models
* Tune chunk sizes for your use case
* Balance result count vs relevance
## Additional Resources
Find the complete implementation in our [sample apps repository](https://github.com/pixeltable/pixeltable/tree/main/docs/sample-apps/multimodal-chat).
# Tools
Source: https://docs.pixeltable.com/docs/examples/chat/tools
Build AI agents that can invoke custom tools
# Building Tool-calling AI Agents
Pixeltable tool-calling apps work in two phases:
1. Define your tools and table structure (once)
2. Use your app (anytime)
```bash
pip install pixeltable openai duckduckgo-search
```
Create `database.py`:
```python
import pixeltable as pxt
import pixeltable.functions as pxtf
from pixeltable.functions.openai import chat_completions, invoke_tools
from duckduckgo_search import DDGS
# Initialize app structure
pxt.drop_dir("agents", force=True)
pxt.create_dir("agents")
# Define tools
@pxt.udf
def search_news(keywords: str, max_results: int) -> str:
"""Search news using DuckDuckGo and return results."""
try:
with DDGS() as ddgs:
results = ddgs.news(
keywords=keywords,
region="wt-wt",
safesearch="off",
timelimit="m",
max_results=max_results,
)
formatted_results = []
for i, r in enumerate(results, 1):
formatted_results.append(
f"{i}. Title: {r['title']}\n"
f" Source: {r['source']}\n"
f" Published: {r['date']}\n"
f" Snippet: {r['body']}\n"
)
return "\n".join(formatted_results)
except Exception as e:
return f"Search failed: {str(e)}"
@pxt.udf
def get_weather(location: str) -> str:
"""Mock weather function - replace with actual API call."""
return f"Current weather in {location}: 72°F, Partly Cloudy"
@pxt.udf
def calculate_metrics(numbers: str) -> str:
"""Calculate basic statistics from a string of numbers."""
try:
nums = [float(n) for n in numbers.split(',')]
return f"Mean: {sum(nums)/len(nums):.2f}, Min: {min(nums)}, Max: {max(nums)}"
except:
return "Error: Please provide comma-separated numbers"
# Register all tools
tools = pxt.tools(search_news, get_weather, calculate_metrics)
# Create base table
tool_agent = pxt.create_table(
"agents.tools",
{"prompt": pxt.String},
if_exists="ignore"
)
tool_choice_opts = [
None,
tools.choice(auto=True),
tools.choice(required=True),
tools.choice(tool='stock_price'),
tools.choice(tool=weather),
tools.choice(required=True, parallel_tool_calls=False),
]
# Add tool selection and execution workflow
tool_agent.add_computed_column(
initial_response=chat_completions(
model="gpt-4o-mini",
messages=[{"role": "user", "content": tool_agent.prompt}],
tools=tools,
tool_choice=tool_choice_opts[1],
)
)
# Add tool execution
tool_agent.add_computed_column(
tool_output=invoke_tools(tools, tool_agent.initial_response)
)
# Add response formatting
tool_agent.add_computed_column(
tool_response_prompt=pxtf.string.format(
"Orginal Prompt\n{0}: Tool Output\n{1}",
tool_agent.prompt,
tool_agent.tool_output
),
if_exists="ignore",
)
# Add final response generation
tool_agent.add_computed_column(
final_response=chat_completions(
model="gpt-4o-mini",
messages=[
{
"role": "system",
"content": "You are a helpful AI assistant that can use various tools. Analyze the tool results and provide a clear, concise response."
},
{"role": "user", "content": tool_agent.tool_response_prompt},
]
)
)
tool_agent.add_computed_column(
answer=tool_agent.final_response.choices[0].message.content
)
```
Create `main.py`:
```python
import pixeltable as pxt
# Connect to your app
tool_agent = pxt.get_table("agents.tools")
# Example queries using different tools
queries = [
"What's the latest news about SpaceX?",
"What's the weather in San Francisco?",
"Calculate metrics for these numbers: 10,20,30,40,50"
]
# Use the agent
for query in queries:
tool_agent.insert(prompt=query)
result = tool_agent.select(
tool_agent.tool_output,
tool_agent.answer
).tail(1)
print(f"\nQuery: {query}")
print(f"Answer: {result['answer'][0]}")
```
## What Makes This Different?
Define and combine multiple tools in a single agent:
```python
tools = pxt.tools(search_news, get_weather, calculate_metrics)
```
The AI automatically chooses the right tool for each query:
```python
tool_choice=tools.choice(required=True)
```
Every tool interaction is stored and can be analyzed:
```python
tool_agent.select(tool_agent.tool_output).collect()
```
# Interactive Demos
Source: https://docs.pixeltable.com/docs/examples/interactive-demos
Explore Pixeltable capabilities through interactive demos
These interactive demos showcase how Pixeltable simplifies building AI applications by providing unified data infrastructure for multimodal workflows.
## Content Generation & Analysis
Transform videos into engaging social media content with AI-powered analysis and generation
Generate rich video narratives with multi-style analysis and TTS narration
Create stories collaboratively with AI assistance and version control
## RAG & Question Answering
Compare different LLMs for RAG with ground truth evaluation
Build intelligent chatbots with document context and semantic search
Convert documents to natural-sounding audio with AI narration
## Computer Vision Applications
Search video frames using text or image queries with CLIP embeddings
Real-time object detection in videos using YOLOX
Analyze call recordings with transcription and insight extraction
## Specialized Applications
AI-powered market analysis with technical indicators
Interactive storytelling with dynamic AI-generated narratives
Rapid iteration and testing of LLM prompts
## Development Tools
Showcase of Pixeltable's unified interface for building multimodal applications
Get help and connect with other developers in our [Discord community](https://discord.gg/QPyqFYx2UN).
# Sample Applications
Source: https://docs.pixeltable.com/docs/examples/sample-apps
Explore real-world applications built with Pixeltable
These sample applications demonstrate how to build production-ready applications using Pixeltable's unified data infrastructure. Each sample includes complete source code and detailed documentation.
All sample applications are open source and available on our [Github](https://github.com/pixeltable/pixeltable).
## Full-Stack Applications
Chrome extension for AI-powered technical analysis of trading charts using Claude Vision
Next.js + FastAPI app for searching content using text and image queries
Gradio interface for iterating on prompts with version control and comparison
RAG-enabled chat interface supporting documents, images, video, and audio
Discord bot with semantic memory for maintaining conversation context
This application shows how to process, index, and search over 80k PDFs related to the JFK assassination.
## Key Features Demonstrated
Unified vector search across text, images, video frames, and audio transcripts
Seamless integration of computer vision and language models
Automatic versioning and incremental updates of data transformations
## Architecture Patterns
RESTful APIs with async support
React-based UI with server-side rendering and API routes
Rapid prototyping of ML model interfaces
Looking to build your own application? Check out our [Getting Started Guide](/docs/getting-started) or join our [Discord community](https://discord.gg/QPyqFYx2UN) for help.
# PDF
Source: https://docs.pixeltable.com/docs/examples/search/PDF
Build a PDF search system using smart chunking and vector embeddings
# Building a PDF Search Workflow
Pixeltable PDF search works in two phases:
1. Define your workflow structure (once)
2. Query your document database (anytime)
```bash
pip install pixeltable tiktoken sentence-transformers
```
Create `table.py`:
```python
import pixeltable as pxt
from pixeltable.iterators import DocumentSplitter
from pixeltable.functions.huggingface import sentence_transformer
# Initialize app structure
pxt.drop_dir("pdf_search", force=True)
pxt.create_dir("pdf_search")
# Create documents table
documents_t = pxt.create_table(
"pdf_search.documents",
{"pdf": pxt.Document}
)
# Create chunked view for efficient processing
documents_chunks = pxt.create_view(
"pdf_search.document_chunks",
documents_t,
iterator=DocumentSplitter.create(
document=documents_t.pdf,
separators="token_limit",
limit=300 # Tokens per chunk
)
)
# Configure embedding model
embed_model = sentence_transformer.using(
model_id="intfloat/e5-large-v2"
)
# Add search capability
documents_chunks.add_embedding_index(
column="text",
string_embed=embed_model
)
```
Create `app.py`:
```python
import pixeltable as pxt
# Connect to your tables
documents_t = pxt.get_table("pdf_search.documents")
documents_chunks = pxt.get_table("pdf_search.document_chunks")
# Sample document URLs
DOCUMENT_URL = (
"https://github.com/pixeltable/pixeltable/raw/release/docs/resources/rag-demo/"
)
document_urls = [
DOCUMENT_URL + doc for doc in [
"Argus-Market-Digest-June-2024.pdf",
"Company-Research-Alphabet.pdf",
"Zacks-Nvidia-Report.pdf",
]
]
# Add documents to database
documents_t.insert({"pdf": url} for url in document_urls)
# Search documents
query = "What are the growth projections for tech companies?"
top_n = 3
sim = documents_chunks.text.similarity(query)
result = (
documents_chunks.order_by(sim, asc=False)
.select(documents_chunks.text, sim=sim)
.collect()
)
# Print results
for i in result:
print(f"Similarity: {i['sim']:.3f}")
print(f"Text: {i['text']}\n")
```
## What Makes This Different?
Token-aware document splitting:
```python
iterator=DocumentSplitter.create(
document=documents_t.pdf,
separators="token_limit",
limit=300
)
```
Natural language document search:
```python
documents_chunks.add_embedding_index(
column="text",
string_embed=embed_model
)
```
Self-maintaining document database:
```python
documents_t.insert([{"pdf": new_url}])
# Chunking and embeddings update automatically
```
## Workflow Components
Advanced document handling:
* Automatic text extraction
* PDF parsing and cleaning
* Structure preservation
* Support for multiple PDF formats
Intelligent text splitting:
* Token-aware chunking
* Configurable chunk sizes
* Context preservation
* Multiple chunking strategies
High-quality search:
* E5 text embeddings
* Fast similarity search
* Natural language queries
* Configurable similarity thresholds
## Advanced Usage
### Custom Chunking Strategies
Configure different chunking approaches:
```python
# Chunk by paragraphs
chunks_by_para = pxt.create_view(
"pdf_search.para_chunks",
documents_t,
iterator=DocumentSplitter.create(
document=documents_t.pdf,
separators="paragraph"
)
)
# Chunk by fixed size
chunks_by_size = pxt.create_view(
"pdf_search.size_chunks",
documents_t,
iterator=DocumentSplitter.create(
document=documents_t.pdf,
separators="fixed",
size=1000 # characters
)
)
```
### Batch Processing
Process multiple PDFs in batch:
```python
# Bulk document insertion
pdf_urls = [
"https://example.com/doc1.pdf",
"https://example.com/doc2.pdf",
"https://example.com/doc3.pdf"
]
documents_t.insert({"pdf": url} for url in pdf_urls)
```
### Advanced Search Functions
Create specialized search functions:
```python
@pxt.query
def search_with_metadata(
query: str,
min_similarity: float,
limit: int
):
sim = documents_chunks.text.similarity(query)
return (
documents_chunks.where(sim >= min_similarity)
.order_by(sim, asc=False)
.select(
documents_chunks.text,
documents_chunks.pdf_name,
documents_chunks.page_number,
similarity=sim
)
.limit(limit)
)
```
# Audio
Source: https://docs.pixeltable.com/docs/examples/search/audio
Build an audio-to-text knowledge base with search capabilities
# Building a Audio Search Workflow
Pixeltable lets you build audio search workflows in two phases:
1. Define your processing workflow (once)
2. Query your knowledge base (anytime)
```bash
pip install pixeltable tiktoken openai openai-whisper spacy sentence-transformers
python -m spacy download en_core_web_sm
```
Create `table.py`:
```python
import pixeltable as pxt
from pixeltable.functions import whisper
from pixeltable.functions.huggingface import sentence_transformer
from pixeltable.iterators.string import StringSplitter
import spacy
# Initialize spaCy
nlp = spacy.load("en_core_web_sm")
# Initialize app structure
pxt.drop_dir("audio_search", force=True)
pxt.create_dir("audio_search")
# Create audio table
audio_t = pxt.create_table(
"audio_search.audio",
{"audio_file": pxt.Audio}
)
# Add transcription workflow
audio_t.add_computed_column(
transcription=whisper.transcribe(
audio=audio_t.audio_file,
model="base.en"
)
)
# Create sentence-level view
sentences_view = pxt.create_view(
"audio_search.audio_sentence_chunks",
audio_t,
iterator=StringSplitter.create(
text=audio_t.transcription.text,
separators="sentence"
)
)
# Configure embedding model
embed_model = sentence_transformer.using(
model_id="intfloat/e5-large-v2"
)
# Add search capability
sentences_view.add_embedding_index(
column="text",
string_embed=embed_model
)
```
Create `app.py`:
```python
import pixeltable as pxt
# Connect to your tables and views
audio_t = pxt.get_table("audio_search.audio")
sentences_view = pxt.get_table("audio_search.audio_sentence_chunks")
# Add audio files to the knowledge base
audio_t.insert([{
"audio_file": "https://raw.githubusercontent.com/pixeltable/pixeltable/main/docs/resources/10-minute%20tour%20of%20Pixeltable.mp3"
}])
# Perform search
query_text = "What are the key features of Pixeltable?"
min_similarity = 0.8
sim = sentences_view.text.similarity(query_text)
result = (
sentences_view.where(sim >= min_similarity)
.order_by(sim, asc=False)
.select(sentences_view.text, sim=sim)
.collect()
)
# Print results
for i in result:
print(f"Similarity: {i['sim']:.3f}")
print(f"Text: {i['text']}\n")
```
## What Makes This Different?
Workflow handles transcription and embedding automatically:
```python
audio_t.add_computed_column(
transcription=whisper.transcribe(
audio=audio_t.audio_file
)
)
```
Intelligent sentence splitting using spaCy:
```python
iterator=StringSplitter.create(
text=audio_t.transcription.text,
separators="sentence"
)
```
Fast search using E5 embeddings:
```python
query_text = "What are the key features of Pixeltable?"
min_similarity = 0.8
sim = sentences_view.text.similarity(query_text)
result = (
sentences_view.where(sim >= min_similarity)
.order_by(sim, asc=False)
.select(sentences_view.text, sim=sim)
.collect()
)
```
## Workflow Components
Uses OpenAI's Whisper for audio transcription:
* Supports multiple audio formats
* Automatic language detection
* High accuracy transcription
* Configurable model sizes (base.en, small.en, etc.)
Splits transcriptions into units:
* Sentence-level segmentation using spaCy
* Maintains context boundaries
* Natural language processing
* Configurable chunking strategies
Implements search using E5 embeddings:
* High-quality vector representations
* Fast similarity search
* Configurable top-k retrieval
* Similarity scores for ranking
## Advanced Usage
### Custom Search Functions
You can create custom search functions with different parameters:
```python
@pxt.query
def search_with_threshold(query_text: str, min_similarity: float):
sim = sentences_view.text.similarity(query_text)
return (
sentences_view.where(sim >= min_similarity)
.order_by(sim, asc=False)
.select(sentences_view.text, sim=sim)
)
```
### Batch Processing
Process multiple audio files in batch:
```python
audio_files = [
"s3://your-bucket/audio1.mp3",
"s3://your-bucket/audio2.mp3",
"s3://your-bucket/audio3.mp3"
]
audio_t.insert({"audio_file": f} for f in audio_files)
```
### Different Embedding Models
You can use different sentence transformer models:
```python
# Alternative embedding models
embed_model = sentence_transformer.using(
model_id="sentence-transformers/all-mpnet-base-v2"
)
# or
embed_model = sentence_transformer.using(
model_id="sentence-transformers/all-MiniLM-L6-v2"
)
```
# Image
Source: https://docs.pixeltable.com/docs/examples/search/images
Build an image search system using OpenAI Vision and vector embeddings
# Building a Visual Search Workflow
Pixeltable image search works in two phases:
1. Define your workflow structure (once)
2. Query your image database (anytime)
```bash
pip install pixeltable openai sentence-transformers
```
Create `table.py`:
```python
import pixeltable as pxt
from pixeltable.functions.openai import vision
from pixeltable.functions.huggingface import sentence_transformer
# Initialize app structure
pxt.drop_dir("image_search", force=True)
pxt.create_dir("image_search")
# Create images table
img_t = pxt.create_table(
"image_search.images",
{"image": pxt.Image}
)
# Add OpenAI Vision analysis
img_t.add_computed_column(
image_description=vision(
prompt="Describe the image. Be specific on the colors you see.",
image=img_t.image,
model="gpt-4o-mini",
)
)
# Configure embedding model
embed_model = sentence_transformer.using(
model_id="intfloat/e5-large-v2"
)
# Add search capability
img_t.add_embedding_index(
column="image_description",
string_embed=embed_model
)
```
Create `app.py`:
```python
import pixeltable as pxt
# Connect to your table
img_t = pxt.get_table("image_search.images")
# Sample image URLs
IMAGE_URL = (
"https://raw.github.com/pixeltable/pixeltable/release/docs/resources/images/"
)
image_urls = [
IMAGE_URL + doc for doc in [
"000000000030.jpg",
"000000000034.jpg",
"000000000042.jpg",
]
]
# Add images to the database
img_t.insert({"image": url} for url in image_urls)
# Perform search
query_text = "Blue flowers"
sim = img_t.image_description.similarity(query_text)
result = (
img_t.order_by(sim, asc=False)
.select(img_t.image, img_t.image_description, similarity=sim)
.collect()
)
# Print results
for i in result:
print(f"Image: {i['image']}\n")
print(f"Image description: {i['image_description']}\n")
```
## What Makes This Different?
OpenAI Vision generates rich image descriptions automatically:
```python
image_description=vision(
prompt="Describe the image...",
image=img_t.image
)
```
Natural language image search using E5 embeddings:
```python
img_t.add_embedding_index(
column="image_description",
string_embed=embed_model
)
```
Self-maintaining image database:
```python
img_t.insert([{"image": new_url}])
# Descriptions and embeddings update automatically
```
## Workflow Components
Advanced image understanding:
* Detailed visual descriptions
* Color analysis
* Object recognition
* Scene understanding
* Customizable description prompts
High-quality search:
* State-of-the-art text embeddings
* Fast similarity search
* Natural language queries
* Configurable similarity thresholds
Built-in data handling:
* Automatic image downloads
* Efficient storage
* Query optimization
* Batch processing support
## Advanced Usage
### Custom Search Functions
Create specialized search functions:
```python
@pxt.query
def search_with_threshold(query: str, min_similarity: float):
sim = img_t.image_description.similarity(query)
return (
img_t.where(sim >= min_similarity)
.order_by(sim, asc=False)
.select(
img_t.image,
img_t.image_description,
similarity=sim
)
)
```
### Batch Processing
Process multiple images in batch:
```python
# Bulk image insertion
image_urls = [
"https://example.com/image1.jpg",
"https://example.com/image2.jpg",
"https://example.com/image3.jpg"
]
img_t.insert({"image": url} for url in image_urls)
```
### Custom Vision Prompts
Customize the OpenAI Vision analysis:
```python
img_t.add_computed_column(
detailed_analysis=vision(
prompt="""Analyze this image in detail:
1. Main objects and their positions
2. Color palette
3. Lighting and atmosphere
4. Any text or symbols present""",
image=img_t.image,
model="gpt-4o-mini",
)
)
```
# Video
Source: https://docs.pixeltable.com/docs/examples/search/video
Build a multimodal video search workflow with Pixeltable
# Building a Multimodal Video Search Workflow
Pixeltable lets you build comprehensive video search workflows combining both audio and visual content:
1. Process both audio and visual content
2. Query your knowledge base by text or visual concepts
```bash
pip install pixeltable openai tiktoken openai-whisper spacy sentence-transformers
```
Create `table.py`:
```python
import pixeltable as pxt
from pixeltable.functions import openai
from pixeltable.functions.huggingface import sentence_transformer
from pixeltable.functions.video import extract_audio
from pixeltable.iterators import AudioSplitter, FrameIterator
from pixeltable.iterators.string import StringSplitter
from pixeltable.functions.openai import vision
# Define the embedding model once for reuse
EMBED_MODEL = sentence_transformer.using(model_id='intfloat/e5-large-v2')
# Set up directory and table name
directory = 'video_index'
table_name = f'{directory}.video'
# Create video table
pxt.create_dir(directory, if_exists='replace_force')
video_index = pxt.create_table(
table_name,
{'video': pxt.Video, 'uploaded_at': pxt.Timestamp}
)
video_index.add_computed_column(
audio_extract=extract_audio(video_index.video, format='mp3')
)
# Create view for frames
frames_view = pxt.create_view(
f'{directory}.video_frames',
video_index,
iterator=FrameIterator.create(
video=video_index.video,
fps=1
)
)
# Create a column for image description using OpenAI gpt-4o-mini
frames_view.add_computed_column(
image_description=vision(
prompt="Provide quick caption for the image.",
image=frames_view.frame,
model="gpt-4o-mini"
)
)
# Create embedding index for image description
frames_view.add_embedding_index('image_description', string_embed=EMBED_MODEL)
# Create view for audio chunks
chunks_view = pxt.create_view(
f'{directory}.video_chunks',
video_index,
iterator=AudioSplitter.create(
audio=video_index.audio_extract,
chunk_duration_sec=30.0,
overlap_sec=2.0,
min_chunk_duration_sec=5.0
)
)
# Audio-to-text for chunks
chunks_view.add_computed_column(
transcription=openai.transcriptions(
audio=chunks_view.audio_chunk, model='whisper-1'
)
)
# Create view that chunks text into sentences
transcription_chunks = pxt.create_view(
f'{directory}.video_sentence_chunks',
chunks_view,
iterator=StringSplitter.create(text=chunks_view.transcription.text, separators='sentence'),
)
# Create embedding index for audio
transcription_chunks.add_embedding_index('text', string_embed=EMBED_MODEL)
```
Create `app.py`:
```python
from datetime import datetime
import pixeltable as pxt
# Constants
directory = 'video_index'
table_name = f'{directory}.video'
# Connect to your tables and views
video_index = pxt.get_table(table_name)
frames_view = pxt.get_table(f'{directory}.video_frames')
transcription_chunks = pxt.get_table(f'{directory}.video_sentence_chunks')
# Insert videos to the knowledge base
videos = [
'https://github.com/pixeltable/pixeltable/raw/release/docs/resources/audio-transcription-demo/'
f'Lex-Fridman-Podcast-430-Excerpt-{n}.mp4'
for n in range(3)
]
video_index.insert({'video': video, 'uploaded_at': datetime.now()} for video in videos[:2])
query_text = "Summarize the conversation"
audio_sim = transcription_chunks.text.similarity(query_text)
audio_results = (
transcription_chunks.order_by(audio_sim, transcription_chunks.uploaded_at, asc=False)
.limit(5)
.select(transcription_chunks.text, transcription_chunks.uploaded_at, similarity=audio_sim)
.collect()
)
print(audio_results)
```
## What Makes This Different?
Process both audio and visual content from the same videos:
```python
# Extract audio from video
video_index.add_computed_column(audio_extract=extract_audio(video_index.video, format='mp3'))
# Extract frames from video
frames_view = pxt.create_view(
f'{directory}.video_frames',
video_index,
iterator=FrameIterator.create(
video=video_index.video,
fps=1
)
)
```
Automatic image description using vision models:
```python
frames_view.add_computed_column(
image_description=vision(
prompt="Provide quick caption for the image.",
image=frames_view.frame,
model="gpt-4o-mini"
)
)
```
Use the same embedding model for both text and image descriptions:
```python
# Define once, use for both modalities
EMBED_MODEL = sentence_transformer.using(model_id='intfloat/e5-large-v2')
# Use for frame descriptions
frames_view.add_embedding_index('image_description', string_embed=EMBED_MODEL)
# Use for transcriptions
transcription_chunks.add_embedding_index('text', string_embed=EMBED_MODEL)
```
Search independently across audio or visual content:
```python
# Get similarity scores
audio_sim = transcription_chunks.text.similarity("Definition of happiness according to the guest")
image_sim = frames_view.image_description.similarity("Lex Fridman interviewing a guest in a podcast setting")
```
## Workflow Components
Extracts both audio and visual content:
* Video file ingestion from URLs or local files
* Automatic audio extraction with format selection
* Frame extraction at configurable frame rates
* Preserves timestamps for accurate retrieval
Analyzes video frames with AI:
* Extracts frames at 1 frame per second (configurable)
* Generates natural language descriptions of each frame
* Creates semantic embeddings of visual content
* Enables search by visual concepts
Handles audio for efficient transcription:
* Smart chunking to optimize transcription
* Configurable chunk duration (30 sec default)
* Overlap between chunks (2 sec default)
* Minimum chunk threshold (5 sec default)
Uses OpenAI's Whisper for transcription:
* High-quality speech recognition
* Multiple language support
* Sentence-level segmentation
* Configurable model selection
Implements unified embedding space:
* Same embedding model for both modalities
* High-quality E5 vector representations
* Fast similarity search across content types
* Configurable top-k retrieval
# Website
Source: https://docs.pixeltable.com/docs/examples/search/website
Build a web content search system using smart chunking and vector embeddings
# Building a Website Search Workflow
Pixeltable website search works in two phases:
1. Define your workflow structure (once)
2. Query your content database (anytime)
```bash
pip install pixeltable tiktoken sentence-transformers
```
Create `table.py`:
```python
import pixeltable as pxt
from pixeltable.iterators import DocumentSplitter
from pixeltable.functions.huggingface import sentence_transformer
# Initialize app structure
pxt.drop_dir("web_search", force=True)
pxt.create_dir("web_search")
# Create website table
websites_t = pxt.create_table(
"web_search.websites",
{"website": pxt.Document}
)
# Create chunked view for efficient processing
websites_chunks = pxt.create_view(
"web_search.website_chunks",
websites_t,
iterator=DocumentSplitter.create(
document=websites_t.website,
separators="token_limit",
limit=300 # Tokens per chunk
)
)
# Configure embedding model
embed_model = sentence_transformer.using(
model_id="intfloat/e5-large-v2"
)
# Add search capability
websites_chunks.add_embedding_index(
column="text",
string_embed=embed_model
)
```
Create `app.py`:
```python
import pixeltable as pxt
import time
# Connect to your tables
websites_t = pxt.get_table("web_search.websites")
websites_chunks = pxt.get_table("web_search.website_chunks")
# Add websites with rate limiting
urls = [
"https://quotes.toscrape.com/",
"https://example.com",
]
websites_t.insert({"website": url} for url in urls)
# Search content
query = "Find inspirational quotes about life"
sim = websites_chunks.text.similarity(query)
top_k = 3
results = (
websites_chunks.order_by(sim, asc=False)
.select(
websites_chunks.text,
websites_chunks.website,
similarity=sim
)
.limit(top_k)
).collect()
# Print results
for r in results:
print(f"Similarity: {r['similarity']:.3f}")
print(f"Source: {r['website']}")
print(f"Content: {r['text']}\n")
```
## What Makes This Different?
Automatic content extraction:
```python
websites_t.insert([{"website": "https://example.com"}])
```
Token-aware content splitting:
```python
iterator=DocumentSplitter.create(
document=websites_t.website,
separators="token_limit"
)
```
Natural language search:
```python
websites_chunks.add_embedding_index(
column="text",
string_embed=embed_model
)
```
## Workflow Components
Advanced web handling:
* HTML content extraction
* Text cleaning and normalization
* Structure preservation
* Automatic encoding detection
Intelligent text splitting:
* Token-aware segmentation
* Configurable chunk sizes
* Context preservation
* Multiple chunking strategies
High-quality search:
* E5 text embeddings
* Fast similarity search
* Natural language queries
* Configurable similarity thresholds
## Advanced Usage
### Custom Chunking Strategies
Configure different chunking approaches:
```python
# Chunk by paragraphs
chunks_by_para = pxt.create_view(
"web_search.para_chunks",
websites_t,
iterator=DocumentSplitter.create(
document=websites_t.website,
separators="paragraph"
)
)
# Chunk by fixed size
chunks_by_size = pxt.create_view(
"web_search.size_chunks",
websites_t,
iterator=DocumentSplitter.create(
document=websites_t.website,
separators="fixed",
size=1000 # characters
)
)
```
### Advanced Search Functions
Create specialized search functions:
```python
@pxt.query
def search_with_metadata(
query: str,
min_similarity: float,
limit: int
):
sim = websites_chunks.text.similarity(query)
return (
websites_chunks.where(sim >= min_similarity)
.order_by(sim, asc=False)
.select(
websites_chunks.text,
websites_chunks.website,
similarity=sim
)
.limit(limit)
)
```
# Use Cases
Source: https://docs.pixeltable.com/docs/examples/use-cases
Explore practical applications and implementation patterns with Pixeltable
These tutorials demonstrate real-world applications of Pixeltable through end-to-end workflows. Each tutorial includes complete code and detailed explanations.
All sample applications are open source and available on our [Github](https://github.com/pixeltable/pixeltable/tree/main/docs/notebooks/use-cases).
## Multimodal Processing
Build an end-to-end workflow for extracting, transcribing, and searching video audio using OpenAI Whisper and semantic indexing
Implement real-time object detection in videos with automatic frame extraction and processing
## RAG Applications
Create a RAG system that summarizes PDFs and answers questions using ChatGPT with automatic incremental updates
Explore flexible RAG operations on Wikipedia articles with document splitting and multiple embedding types
## Key Workflows
Extract and transcribe audio from videos with automatic indexing
Process video frames with ML models in real-time
Chunk and embed documents for semantic search
## Implementation Features
Tables automatically update as new data arrives
Results remain available across sessions
Processing steps run automatically in sequence
## Common Patterns
1. Extract media (audio/frames)
2. Process with ML models
3. Index results for search
1. Chunk documents
2. Generate embeddings
3. Build semantic index
4. Query with LLMs
Each tutorial builds on Pixeltable fundamentals. New to Pixeltable? Start with our [Pixeltable Basics](/docs/getting-started) tutorial or join our [Discord community](https://discord.gg/QPyqFYx2UN) for help.
# Label Studio
Source: https://docs.pixeltable.com/docs/examples/vision/label-studio
Build annotation workflows with Pixeltable and Label Studio in two phases
# Building Label Studio Annotation Apps
Pixeltable's Label Studio integration works in two phases:
1. Define your annotation workflow (once)
2. Use and annotate your data (anytime)
This integration requires a local Pixeltable installation and cannot be run in Colab or Kaggle.
```bash
pip install pixeltable label-studio label-studio-sdk torch transformers
```
Create `table.py`:
```python
import pixeltable as pxt
from pixeltable.iterators import FrameIterator
from pixeltable.functions.huggingface import detr_for_object_detection, detr_to_coco
from datetime import datetime
# Initialize app structure
pxt.drop_dir('annotation', force=True)
pxt.create_dir('annotation')
# Create base video table
videos = pxt.create_table(
'annotation.videos',
{
'video': pxt.Video,
'date': pxt.Timestamp
},
if_exists="ignore"
)
# Create frame extraction view
frames = pxt.create_view(
'annotation.frames',
videos,
iterator=FrameIterator.create(
video=videos.video,
fps=0.25 # Extract 1 frame every 4 seconds
)
)
# Add object detection for pre-annotations
frames.add_computed_column(
detections=detr_for_object_detection(
frames.frame,
model_id='facebook/detr-resnet-50',
threshold=0.95
)
)
# Convert detections to COCO format for Label Studio
frames.add_computed_column(
preannotations=detr_to_coco(frames.frame, frames.detections)
)
# Define Label Studio configurations
video_config = '''
'''
frame_config = '''
'''
# Create Label Studio projects
pxt.io.create_label_studio_project(
videos,
video_config,
media_import_method='url' # Recommended for production
)
pxt.io.create_label_studio_project(
frames,
frame_config,
media_import_method='url'
)
```
Create `app.py`:
```python
import pixeltable as pxt
import os
# Set up Label Studio connection
if 'LABEL_STUDIO_URL' not in os.environ:
os.environ['LABEL_STUDIO_URL'] = 'http://localhost:8080/'
# Connect to your tables
videos = pxt.get_table("annotation.videos")
frames = pxt.get_table("annotation.frames")
# Insert videos
url_prefix = 'http://multimedia-commons.s3-website-us-west-2.amazonaws.com/data/videos/mp4/'
video_files = [
'122/8ff/1228ff94bf742242ee7c88e4769ad5d5.mp4',
'2cf/a20/2cfa205eae979b31b1144abd9fa4e521.mp4'
]
videos.insert([{
'video': url_prefix + file,
'date': datetime.now()
} for file in video_files])
# Sync with Label Studio
videos.sync()
frames.sync()
# After annotation, retrieve results
results = videos.select(
videos.video,
videos.annotations,
category=videos.annotations[0].result[0].value.choices[0]
).collect()
frame_results = frames.select(
frames.frame,
frames.annotations,
frames.preannotations
).collect()
```
## Key Features
Automatic object detection for pre-labeling:
```python
frames.add_computed_column(
detections=detr_for_object_detection(
frames.frame
)
)
```
Automatic video frame sampling:
```python
iterator=FrameIterator.create(
video=videos.video,
fps=0.25
)
```
New data automatically flows through workflow:
```python
videos.insert(new_video)
videos.sync() # Syncs only new data
```
## Storage Options
Default method, good for small projects:
```python
pxt.io.create_label_studio_project(
videos,
video_config
)
```
Recommended for production:
```python
pxt.io.create_label_studio_project(
videos,
video_config,
media_import_method='url'
)
```
For secure cloud storage:
```python
pxt.io.create_label_studio_project(
videos,
video_config,
media_import_method='url',
s3_configuration={
'bucket': 'my-bucket',
'aws_access_key_id': key,
'aws_secret_access_key': secret
}
)
```
# Voxel51
Source: https://docs.pixeltable.com/docs/examples/vision/voxel51
Build image analysis workflows with Pixeltable and Voxel51 in two phases
# Building Voxel51 Analysis Apps
Pixeltable's Voxel51 integration works in two phases:
1. Define your processing workflow (once)
2. Use and visualize your data (anytime)
```bash
pip install pixeltable fiftyone transformers
```
Create `table.py`:
```python
import pixeltable as pxt
from pixeltable.functions.huggingface import (
vit_for_image_classification,
detr_for_object_detection
)
# Initialize app structure
pxt.drop_dir('vision', force=True)
pxt.create_dir('vision')
# Create base table
images = pxt.create_table(
'vision.images',
{'image': pxt.Image},
if_exists="ignore"
)
# Add model inference columns
images.add_computed_column(
classifications=vit_for_image_classification(
images.image,
model_id='google/vit-base-patch16-224'
)
)
images.add_computed_column(
detections=detr_for_object_detection(
images.image,
model_id='facebook/detr-resnet-50'
)
)
# Optional: Add additional model for comparison
images.add_computed_column(
detections_101=detr_for_object_detection(
images.image,
model_id='facebook/detr-resnet-101'
)
)
# Define label conversion functions
@pxt.udf
def vit_to_fo(vit_labels: list) -> list:
"""Convert ViT classification output to Voxel51 format"""
return [
{'label': label, 'confidence': score}
for label, score in zip(
vit_labels.label_text,
vit_labels.scores
)
]
@pxt.udf
def detr_to_fo(img: pxt.Image, detr_labels: dict) -> list:
"""Convert DETR detection output to Voxel51 format"""
result = []
for label, box, score in zip(
detr_labels.label_text,
detr_labels.boxes,
detr_labels.scores
):
# Convert DETR (x1,y1,x2,y2) to Voxel51 (x,y,w,h) format
fo_box = [
box[0] / img.width,
box[1] / img.height,
(box[2] - box[0]) / img.width,
(box[3] - box[1]) / img.height,
]
result.append({
'label': label,
'bounding_box': fo_box,
'confidence': score
})
return result
```
Create `app.py`:
```python
import pixeltable as pxt
import fiftyone as fo
# Connect to your table
images = pxt.get_table("vision.images")
# Insert some images
url_prefix = 'https://raw.githubusercontent.com/pixeltable/pixeltable/main/docs/source/data/images'
urls = [
f'{url_prefix}/000000000019.jpg',
f'{url_prefix}/000000000025.jpg',
f'{url_prefix}/000000000030.jpg',
f'{url_prefix}/000000000034.jpg',
]
images.insert({'image': url} for url in urls)
# Export to Voxel51 with multiple label sets
fo_dataset = pxt.io.export_images_as_fo_dataset(
images,
images.image,
classifications=vit_to_fo(images.classifications),
detections={
'detections_50': detr_to_fo(images.image, images.detections),
'detections_101': detr_to_fo(images.image, images.detections_101)
}
)
# Launch Voxel51 visualization
session = fo.launch_app(fo_dataset)
```
## Key Features
Built-in support for popular vision models:
```python
classifications=vit_for_image_classification(
images.image,
model_id='google/vit-base-patch16-224'
)
```
Compare different models side-by-side:
```python
detections={
'detections_50': detr_to_fo(...),
'detections_101': detr_to_fo(...)
}
```
Launch Voxel51's powerful interface:
```python
session = fo.launch_app(fo_dataset)
```
## Supported Label Types
Single-label or multi-label image classifications:
```python
{
'label': 'cat',
'confidence': 0.95
}
```
Object detection with bounding boxes:
```python
{
'label': 'person',
'bounding_box': [x, y, w, h],
'confidence': 0.98
}
```
# YOLOX Object Detection
Source: https://docs.pixeltable.com/docs/examples/vision/yolox
Use YOLOX object detection in Pixeltable by defining your schema, then using it
# Building YOLOX Detection Apps
Pixeltable YOLOX apps work in two phases:
1. Define your detection workflow (once)
2. Use your app (anytime)
## About Pixeltable YOLOX
`pixeltable-yolox` is a lightweight, Apache-licensed object detection library built on PyTorch. It is a fork of the MegVii [YOLOX](https://github.com/Megvii-BaseDetection/YOLOX) package, modernized for recent versions of Python and refactored for easier use as a Python library. This library is designed for developers seeking a modern, accessible object detection solution for both academic and commercial projects.
Pixeltable YOLOX is still under development, and some features of the original YOLOX have not been ported yet. However, it offers a robust foundation for object detection tasks.
Developed by Pixeltable, Inc., a venture-backed AI infrastructure startup, this library aims to meet the vision community's need for a lightweight object detection library with an untainted open source license. The Pixeltable team brings decades of collective experience in open source development from companies like Google, Cloudera, Twitter, Amazon, and Airbnb.
```bash
pip install pixeltable pixeltable-yolox
```
Create `table.py`:
```python
import PIL
import pixeltable as pxt
from yolox.models import Yolox
from yolox.data.datasets import COCO_CLASSES
t = pxt.create_table('image', {'image': pxt.Image}, if_exists='replace')
@pxt.udf
def detect(image: PIL.Image.Image) -> list[str]:
model = Yolox.from_pretrained("yolox_s")
result = model([image])
coco_labels = [COCO_CLASSES[label] for label in result[0]["labels"]]
return coco_labels
t.add_computed_column(classification=detect(t.image), if_exists='replace')
```
Create `app.py`:
```python
import pixeltable as pxt
from yolox.data.datasets import COCO_CLASSES
# Connect to your tables
images = pxt.get_table("image")
# Insert some images
prefix = 'https://upload.wikimedia.org/wikipedia/commons'
paths = [
'/1/15/Cat_August_2010-4.jpg',
'/e/e1/Example_of_a_Dog.jpg',
'/thumb/b/bf/Bird_Diversity_2013.png/300px-Bird_Diversity_2013.png'
]
images.insert({'image': prefix + p} for p in paths)
# Get detection results
image_results = images.select().collect()
# Process and display detailed results
for idx, result in enumerate(image_results):
print(f"Image {idx + 1} Detection Results:")
detections = result['classification']
for label in detections:
class_name = label
print(f" - Detected: {class_name}")
```
## Advanced Inference with YOLOX
Beyond basic object detection, `pixeltable-yolox` provides detailed output including bounding boxes, confidence scores, and class labels based on the COCO dataset categories.
Join our community and contribute to the development of Pixeltable YOLOX
# Embedding Models
Source: https://docs.pixeltable.com/docs/integrations/embedding-model
Learn how to integrate custom embedding models with Pixeltable
Pixeltable provides extensive built-in support for popular embedding models, but you can also easily integrate your own custom embedding models. This guide shows you how to create and use custom embedding functions for any model architecture.
## Quick Start
Here's a simple example using a custom BERT model:
```python
import tensorflow as tf
import tensorflow_hub as hub
import pixeltable as pxt
@pxt.udf
def custom_bert_embed(text: str) -> pxt.Array[(512,), pxt.Float]:
"""Basic BERT embedding function"""
preprocessor = hub.load('https://tfhub.dev/tensorflow/bert_en_uncased_preprocess/3')
model = hub.load('https://tfhub.dev/tensorflow/small_bert/bert_en_uncased_L-4_H-512_A-8/2')
tensor = tf.constant([text])
result = model(preprocessor(tensor))['pooled_output']
return result.numpy()[0, :]
# Create table and add embedding index
docs = pxt.create_table('documents', {'text': pxt.String})
docs.add_embedding_index('text', string_embed=custom_bert_embed)
```
## Production Best Practices
The quick start example works but isn't production-ready. Below we'll cover how to optimize your custom embedding UDFs.
### Model Caching
Always cache your model instances to avoid reloading on every call:
```python
@pxt.udf
def optimized_bert_embed(text: str) -> pxt.Array[(512,), pxt.Float]:
"""BERT embedding function with model caching"""
if not hasattr(optimized_bert_embed, 'model'):
# Load models once
optimized_bert_embed.preprocessor = hub.load(
'https://tfhub.dev/tensorflow/bert_en_uncased_preprocess/3'
)
optimized_bert_embed.model = hub.load(
'https://tfhub.dev/tensorflow/small_bert/bert_en_uncased_L-4_H-512_A-8/2'
)
tensor = tf.constant([text])
result = optimized_bert_embed.model(
optimized_bert_embed.preprocessor(tensor)
)['pooled_output']
return result.numpy()[0, :]
```
### Batch Processing
Use Pixeltable's batching capabilities for better performance:
```python
from pixeltable.func import Batch
@pxt.udf(batch_size=32)
def batched_bert_embed(texts: Batch[str]) -> Batch[pxt.Array[(512,), pxt.Float]]:
"""BERT embedding function with batching"""
if not hasattr(batched_bert_embed, 'model'):
batched_bert_embed.preprocessor = hub.load(
'https://tfhub.dev/tensorflow/bert_en_uncased_preprocess/3'
)
batched_bert_embed.model = hub.load(
'https://tfhub.dev/tensorflow/small_bert/bert_en_uncased_L-4_H-512_A-8/2'
)
# Process entire batch at once
tensor = tf.constant(list(texts))
results = batched_bert_embed.model(
batched_bert_embed.preprocessor(tensor)
)['pooled_output']
return [r for r in results.numpy()]
```
## Error Handling
Always implement proper error handling in production UDFs:
```python
@pxt.udf
def robust_bert_embed(text: str) -> pxt.Array[(512,), pxt.Float]:
"""BERT embedding with error handling"""
try:
if not text or len(text.strip()) == 0:
raise ValueError("Empty text input")
if not hasattr(robust_bert_embed, 'model'):
# Model initialization...
pass
tensor = tf.constant([text])
result = robust_bert_embed.model(
robust_bert_embed.preprocessor(tensor)
)['pooled_output']
return result.numpy()[0, :]
except Exception as e:
logger.error(f"Embedding failed: {str(e)}")
raise
```
## Additional Resources
Complete UDF documentation
More embedding examples
Find embedding models
# Ecosystem
Source: https://docs.pixeltable.com/docs/integrations/frameworks
Explore Pixeltable ecosystem of built-in integrations for AI/ML workflows
From language models to computer vision frameworks, Pixeltable integrates with the entire ecosystem. All integrations are available out-of-the-box with Pixeltable installation. No additional setup required unless specified.
If you have a framework that you want us to integrate with, please reach out and you can also leverage Pixeltable's [UDFs](https://github.com/pixeltable/pixeltable/blob/main/docs/notebooks/feature-guides/udfs-in-pixeltable.ipynb) to build your own.
## Cloud LLM Providers
Integrate Claude models for advanced language understanding and generation with multimodal capabilities
Access Google's Gemini models for state-of-the-art multimodal AI capabilities
Leverage GPT models for text generation, embeddings, and image analysis
Use Mistral's efficient language models for various NLP tasks
Access a variety of open-source models through Together AI's platform
Use Fireworks.ai's optimized model inference infrastructure
Leverage DeepSeek's powerful language and code models for text and code generation
Access a variety of AI models through AWS Bedrock's unified API
Access Meta's Llama models for text generation and embeddings
## Local LLM Runtimes
High-performance C++ implementation for running LLMs on CPU and GPU
Easy-to-use toolkit for running and managing open-source models locally
## Computer Vision
State-of-the-art object detection with YOLOX models
Advanced video and image dataset management with Voxel51
## Annotation Tools
Comprehensive platform for data annotation and labeling workflows
## Audio Processing
High-quality speech recognition and transcription using OpenAI's Whisper models
## Data Wrangling
Import and Export from and to Pandas DataFrames if needed
## Usage Examples
```python
import pixeltable as pxt
from pixeltable.functions import openai
# Create a table with computed column for OpenAI completion
table = pxt.create_table('responses', {'prompt': pxt.String})
table.add_computed_column(
response=openai.chat_completions(
messages=[{'role': 'user', 'content': table.prompt}],
model='gpt-4'
)
)
```
```python
from pixeltable.functions.yolox import yolox
# Add object detection to video frames
frames_view.add_computed_column(
detections=yolox(
frames_view.frame,
model_id='yolox_l'
)
)
```
```python
from pixeltable.functions import openai
# Transcribe audio files
audio_table.add_computed_column(
transcription=openai.transcriptions(
audio=audio_table.file,
model='whisper-1'
)
)
```
## Integration Features
Most integrations work out-of-the-box with simple API configuration
Use integrations directly in computed columns for automated processing
Efficient handling of batch operations with automatic optimization
Check our [Github](https://github.com/pixeltable/pixeltable/tree/main/docs/notebooks/integrations) for detailed usage instructions for each integration.
Need help setting up integrations? Join our [Discord community](https://discord.com/invite/QPyqFYx2UN) for support.
# Model Hub & Repositories
Source: https://docs.pixeltable.com/docs/integrations/models
Explore pre-trained models and integrations available in Pixeltable
## Model Hubs
Access thousands of pre-trained models across vision, text, and audio domains
Deploy and run ML models through Replicate's cloud infrastructure
## Hugging Face Models
Pixeltable provides seamless integration with Hugging Face's transformers library through built-in UDFs. These functions allow you to use state-of-the-art models directly in your data workflows.
Requirements: Install required dependencies with `pip install transformers`. Some models may require additional packages like `sentence-transformers` or `torch`.
### CLIP Models
```python
from pixeltable.functions.huggingface import clip
# For text embedding
t.add_computed_column(
text_embedding=clip(
t.text_column,
model_id='openai/clip-vit-base-patch32'
)
)
# For image embedding
t.add_computed_column(
image_embedding=clip(
t.image_column,
model_id='openai/clip-vit-base-patch32'
)
)
```
Perfect for multimodal applications combining text and image understanding.
### Cross-Encoders
```python
from pixeltable.functions.huggingface import cross_encoder
t.add_computed_column(
similarity_score=cross_encoder(
t.sentence1,
t.sentence2,
model_id='cross-encoder/ms-marco-MiniLM-L-4-v2'
)
)
```
Ideal for semantic similarity tasks and sentence pair classification.
### DETR Object Detection
```python
from pixeltable.functions.huggingface import detr_for_object_detection
t.add_computed_column(
detections=detr_for_object_detection(
t.image,
model_id='facebook/detr-resnet-50',
threshold=0.8
)
)
# Convert to COCO format if needed
t.add_computed_column(
coco_format=detr_to_coco(t.image, t.detections)
)
```
Powerful object detection with end-to-end transformer architecture.
### Sentence Transformers
```python
from pixeltable.functions.huggingface import sentence_transformer
t.add_computed_column(
embeddings=sentence_transformer(
t.text,
model_id='sentence-transformers/all-mpnet-base-v2',
normalize_embeddings=True
)
)
```
State-of-the-art sentence and document embeddings for semantic search and similarity.
### Speech2Text Models
```python
from pixeltable.functions.huggingface import speech2text_for_conditional_generation
# Basic transcription
t.add_computed_column(
transcript=speech2text_for_conditional_generation(
t.audio,
model_id='facebook/s2t-small-librispeech-asr'
)
)
# Multilingual translation
t.add_computed_column(
translation=speech2text_for_conditional_generation(
t.audio,
model_id='facebook/s2t-medium-mustc-multilingual-st',
language='fr'
)
)
```
Support for both transcription and translation of audio content.
### Vision Transformer (ViT)
```python
from pixeltable.functions.huggingface import vit_for_image_classification
t.add_computed_column(
classifications=vit_for_image_classification(
t.image,
model_id='google/vit-base-patch16-224',
top_k=5
)
)
```
Modern image classification using transformer architecture.
## Integration Features
All models can be used directly in computed columns for automated processing:
```python
# Example: Combine CLIP embeddings with ViT classification
t.add_computed_column(
image_features=clip(t.image, model_id='openai/clip-vit-base-patch32')
)
t.add_computed_column(
classifications=vit_for_image_classification(t.image, model_id='google/vit-base-patch16-224')
)
```
Pixeltable automatically handles batch processing and optimization:
```python
# Pixeltable efficiently processes large datasets
t.add_computed_column(
embeddings=sentence_transformer(
t.text,
model_id='all-mpnet-base-v2'
)
)
```
```python
# Object Detection Output
{
'scores': [0.99, 0.98], # confidence scores
'labels': [25, 30], # class labels
'label_text': ['cat', 'dog'], # human-readable labels
'boxes': [[x1, y1, x2, y2], ...] # bounding boxes
}
# Image Classification Output
{
'scores': [0.8, 0.15], # class probabilities
'labels': [340, 353], # class IDs
'label_text': ['zebra', 'gazelle'] # class names
}
```
## Model Selection Guide
Select the appropriate model family based on your task:
* Text/Image Similarity → CLIP
* Object Detection → DETR
* Text Embeddings → Sentence Transformers
* Speech Processing → Speech2Text
* Image Classification → ViT
Install necessary dependencies:
```bash
pip install transformers torch sentence-transformers
```
Import and use the model in your Pixeltable workflow:
```python
from pixeltable.functions.huggingface import clip, sentence_transformer
```
Need help choosing the right model? Check our [example notebooks](https://github.com/pixeltable/pixeltable/tree/main/docs/notebooks/integrations) or join our [Discord community](https://discord.com/invite/QPyqFYx2UN).
# Model Context Protocol
Source: https://docs.pixeltable.com/docs/libraries/mcp
Extending AI capabilities with Pixeltable MCP servers
View the source code and contribute to our Pixeltable MCP servers
## What is MCP?
The [Model Context Protocol (MCP)](https://modelcontextprotocol.io/) is an open protocol that standardizes how applications provide context to Large Language Models (LLMs). Think of MCP like a USB-C port for AI applications - it provides a standardized way to connect AI models to different data sources and tools.
MCP follows a client-server architecture where:
* **MCP Hosts**: Programs like Claude Desktop, IDEs, or AI tools that want to access data through MCP
* **MCP Clients**: Protocol clients that maintain 1:1 connections with servers
* **MCP Servers**: Lightweight programs that each expose specific capabilities through the standardized Model Context Protocol
* **Local Data Sources**: Your computer's files, databases, and services that MCP servers can securely access
* **Remote Services**: External systems available over the internet (e.g., through APIs) that MCP servers can connect to
## Why We Built Pixeltable MCP Servers
Pixeltable excels at handling multimodal data - audio, video, images, and documents. However, LLMs often struggle with these data types without specialized tools. By implementing MCP servers for Pixeltable, we've created a bridge that allows LLMs to:
1. **Access multimodal data**: LLMs can now directly work with audio transcriptions, video frames, image analysis, and document content
2. **Perform specialized operations**: Each server provides domain-specific tools optimized for its data type
3. **Maintain security**: Data remains within your infrastructure while still being accessible to LLMs
4. **Standardize interactions**: Using the MCP protocol ensures compatibility with a growing ecosystem of AI applications
## Our MCP Server Collection
We've developed a suite of specialized MCP servers that expose Pixeltable's multimodal capabilities:
### Audio Index Server
Located in `servers/audio-index/`, this server provides:
* Audio file indexing with transcription capabilities
* Semantic search over audio content
* Multi-index support for audio collections
* Accessible at `/audio` endpoint
### Video Index Server
Located in `servers/video-index/`, this server provides:
* Video file indexing with frame extraction
* Content-based video search
* Accessible at `/video` endpoint
### Image Index Server
Located in `servers/image-index/`, this server provides:
* Image indexing with object detection
* Similarity search for images
* Accessible at `/image` endpoint
### Document Index Server
Located in `servers/doc-index/`, this server provides:
* Document indexing with text extraction
* Retrieval-Augmented Generation (RAG) support
* Accessible at `/doc` endpoint
### Base SDK Server
Located in `servers/base-sdk/`, this server provides:
* Core functionality for Pixeltable integration
* Foundation for building specialized servers
## How It Works
Our MCP servers follow this general architecture:
```mermaid
flowchart LR
subgraph "AI Application"
Host["MCP Client\n(Cursor, Claude, etc.)"]
end
subgraph "Docker Environment"
S1["Audio Index Server\nlocalhost:8080/sse"]
S2["Video Index Server\nlocalhost:8081/sse"]
S3["Image Index Server\nlocalhost:8082/sse"]
S4["Document Index Server\nlocalhost:8083/sse"]
end
subgraph "Pixeltable"
DB[("Multimodal\nDatabase")]
end
Host <-->|"MCP Protocol"| S1
Host <-->|"MCP Protocol"| S2
Host <-->|"MCP Protocol"| S3
Host <-->|"MCP Protocol"| S4
S1 <--> DB
S2 <--> DB
S3 <--> DB
S4 <--> DB
```
When an AI application needs to work with multimodal data:
1. You start the Pixeltable MCP servers using docker-compose
2. Your MCP client (like Cursor) connects to the servers via the localhost URLs (e.g., `http://localhost:8080/sse`)
3. The servers expose their capabilities through the standardized MCP protocol
4. Your AI application can now discover and use these capabilities
5. The servers handle all the complex data processing using Pixeltable
6. Results are returned to your AI application in a format it can understand and use
## MCP Features Supported
Our servers implement the following MCP capabilities:
| Feature | Support | Description |
| -------------------------------------------------------------------- | ------- | ----------------------------------------- |
| [Resources](https://modelcontextprotocol.io/docs/concepts/resources) | ✅ | Access to indexed multimodal data |
| [Tools](https://modelcontextprotocol.io/docs/concepts/tools) | ✅ | Specialized operations for each data type |
| [Prompts](https://modelcontextprotocol.io/docs/concepts/prompts) | ✅ | Pre-defined templates for common tasks |
| [Sampling](https://modelcontextprotocol.io/docs/concepts/sampling) | ❌ | Not currently implemented |
## Getting Started
### Installation
To use our MCP servers with Pixeltable:
```bash
# Clone the repository
git clone https://github.com/pixeltable/mcp-server-pixeltable.git
cd mcp-server-pixeltable/servers
# Run locally with docker-compose
docker-compose up --build
```
That's it! The servers are now running as remote services that your MCP clients can connect to.
### Configuration
Each server runs on its designated port and is accessible via localhost:
* Audio Index Server: `http://localhost:8080/sse`
* Video Index Server: `http://localhost:8081/sse`
* Image Index Server: `http://localhost:8082/sse`
* Document Index Server: `http://localhost:8083/sse`
You can configure service settings in the respective Dockerfile or through environment variables.
### Using with MCP Clients
To use these servers with any MCP client (like Cursor, Claude Desktop, or other MCP-compatible tools):
1. Start the servers using docker-compose as shown above
2. In your MCP client, add the server URLs:
* For Audio Index: `http://localhost:8080/sse`
* For Video Index: `http://localhost:8081/sse`
* For Image Index: `http://localhost:8082/sse`
* For Document Index: `http://localhost:8083/sse`
No complex configuration is needed - just add the URLs to your client and start using the enhanced capabilities!
### Example: Adding to Cursor
1. Open Cursor
2. Go to Settings > MCP
3. Add the server URLs (e.g., `http://localhost:8080/sse`)
4. Save and start using the Pixeltable MCP capabilities
## Example Use Cases
Here are some examples of what you can do with our MCP servers:
### Audio Analysis
```
Can you transcribe this audio file and summarize the key points?
```
### Video Content Search
```
Find all scenes in this video that contain people talking about climate change.
```
### Image Recognition
```
Analyze this collection of product images and identify any quality issues.
```
### Document Intelligence
```
Extract the main arguments from these legal documents and compare them.
```
## Benefits of MCP Integration
By integrating Pixeltable with MCP, we've created several advantages:
1. **Enhanced AI capabilities**: LLMs can now work with rich multimodal data
2. **Standardized interface**: Consistent interaction patterns across different data types
3. **Simple deployment**: Just run `docker-compose up` and connect via localhost URLs
4. **No complex configuration**: Add the server URLs directly to your MCP client
5. **Works with any MCP client**: Compatible with Cursor, Claude Desktop, and other MCP-enabled tools
6. **Extensible architecture**: Easy to add new capabilities or data types
7. **Growing ecosystem**: Part of the expanding MCP ecosystem
## Future Development
We're actively working on enhancing our MCP servers with:
* Additional data type support
* More sophisticated indexing and search capabilities
* Improved performance for large datasets
* Extended tool functionality
* Better integration with the broader MCP ecosystem
## Contributing
We welcome contributions to our MCP server implementations! Please check our [GitHub repository](https://github.com/pixeltable/pixeltable-mcp-server) for contribution guidelines.
## Support
* GitHub Issues: [Report bugs or request features](https://github.com/pixeltable/pixeltable-mcp-server/issues)
* Discord: Join our [community](https://discord.gg/pixeltable)
## Learn More
* [Pixeltable Documentation](https://docs.pixeltable.com)
* [Model Context Protocol](https://modelcontextprotocol.io/)
* [MCP Specification](https://spec.modelcontextprotocol.io/)
# Pixelagent
Source: https://docs.pixeltable.com/docs/libraries/pixelagent
An Agent Engineering Blueprint powered by Pixeltable
View the source code and contribute to Pixelagent
# Pixelagent: An Agent Engineering Blueprint
We see agents as the intersection of an LLM, storage, and orchestration. Pixeltable unifies this interface into a single declarative framework, making it the de-facto choice for engineers to build custom agentic applications with build-your-own functionality for memory, tool-calling, and more.
Pixelagent is more than just another agent framework—it's a comprehensive guide to building production-grade agent systems from the ground up. With our blueprint approach, you'll learn the engineering patterns behind successful agent architectures while leveraging Pixeltable's powerful data management capabilities to handle the complex infrastructure needs.
### The Engineering Journey
We start with fundamental patterns and gradually introduce complexity, allowing you to understand every aspect of agent construction:
1. **Single-Provider Implementation**: Master core agent functionality with one LLM provider
2. **Multi-Provider Architecture**: Extend your solution to support multiple LLMs through clean inheritance
3. **Advanced Capabilities**: Add specialized extensions for memory, reasoning, reflection, and more
### Start with a single-provider `Agent()` class
Learn how we craft an agent using Claude, with cost-saving tricks like skipping chat history in tool calls
See how we use GPT models to create a lean, powerful agent with the same Pixeltable-driven efficiency
The foundation of our blueprint begins with creating a simple yet powerful Agent class for a single LLM provider. This initial step focuses on establishing core functionality like conversation handling, memory management, and basic tool integration. By starting with a single provider, you'll learn the fundamental patterns that can later be extended to support additional LLM services.
The Agent() class is built on three core components:
1. **Memory Management**: Using Pixeltable tables to store conversation history and enable persistent memory across sessions
2. **Chat Pipeline**: A series of computed columns that process user input and generate responses
3. **Tool Execution**: Optional support for executing functions/tools during conversations
### Next: Extend `Agent()` to multiple providers
Once you've mastered building an agent for a single LLM provider, the next step is extending your architecture to support multiple providers. This progression is crucial for production systems that need flexibility to switch between different LLM services based on capabilities, cost, or availability. Our blueprint demonstrates a clean, inheritance-based approach to achieve this multi-provider support without duplicating code.
By implementing a BaseAgent abstract class that handles common functionality, you can create specialized provider-specific implementations that override only what's unique to each provider. This architecture allows you to maintain a consistent interface while adapting to the nuances of different LLM APIs.
Learn how to extend the Agent class to support multiple LLM providers
## Plug-and-Play Extensions
With a solid agent foundation in place, the final step is adding specialized capabilities that transform a basic conversational agent into a sophisticated AI system. Our blueprint includes detailed implementations of the most important agentic patterns, each designed as modular extensions that can be mixed and matched based on your specific requirements.
These extensions leverage Pixeltable's data management capabilities to implement complex features like long-term memory, reflection loops, and multi-step reasoning—all while maintaining a clean, maintainable codebase. Each extension is explained with both theoretical background and practical implementation details, allowing you to understand not just how to use them, but how they work under the hood.
Add custom python functions as tools to enable your agent to interact with external systems, retrieve information, and perform actions beyond just conversation.
Implement sophisticated memory systems that allow your agent to recall past interactions, store knowledge, and perform semantic search over its memory.
Add self-improvement capabilities through reflection loops where agents can evaluate their own performance and adjust their behavior accordingly.
Implement advanced reasoning patterns like ReAct and Chain-of-Thought to handle complex multi-step tasks with robust problem-solving capabilities.
## Usage
Pixelagent is designed to be both powerful and approachable. Our API emphasizes clarity and simplicity, allowing you to get started quickly while still having access to advanced features when needed. The following examples demonstrate how to use Pixelagent in various scenarios, from basic conversational agents to complex systems with tools and specialized reasoning patterns.
```bash
pip install pixelagent
# Install provider-specific dependencies
pip install anthropic # For Claude models
pip install openai # For GPT models
```
```python
from pixelagent.anthropic import Agent # Or from pixelagent.openai import Agent
# Create a simple agent
agent = Agent(
agent_name="my_assistant",
system_prompt="You are a helpful assistant."
)
# Chat with your agent
response = agent.chat("Hello, who are you?")
print(response)
```
```python
import pixeltable as pxt
from pixelagent.anthropic import Agent
import yfinance as yf
# Define a tool as a UDF
@pxt.udf
def stock_price(ticker: str) -> dict:
"""Get stock information for a ticker symbol"""
stock = yf.Ticker(ticker)
return stock.info
# Create agent with tool
agent = Agent(
agent_name="financial_assistant",
system_prompt="You are a financial analyst assistant.",
tools=pxt.tools(stock_price)
)
# Use tool calling
result = agent.tool_call("What's the current price of NVDA?")
print(result)
```
```python
import pixeltable as pxt
# Agent memory is automatically persisted
memory = pxt.get_table("my_assistant.memory")
conversations = memory.collect()
# Access tool call history
tools_log = pxt.get_table("financial_assistant.tools")
tool_history = tools_log.collect()
```
## Advanced Features
Beyond the basics, Pixelagent provides sophisticated capabilities that allow you to build production-grade agent systems. These features demonstrate the power of combining Pixeltable's data management with advanced agent patterns, enabling you to create AI systems that can handle complex tasks, maintain context over long conversations, and adapt to changing requirements.
```python
# Unlimited memory
infinite_agent = Agent(
agent_name="historian",
system_prompt="You remember everything.",
n_latest_messages=None # No limit on conversation history
)
```
```python
import re
from datetime import datetime
from pixelagent.openai import Agent
import pixeltable as pxt
# Define a tool
@pxt.udf
def stock_info(ticker: str) -> dict:
"""Get stock information for analysis"""
import yfinance as yf
stock = yf.Ticker(ticker)
return stock.info
# ReAct system prompt with structured reasoning pattern
REACT_PROMPT = """
Today is {date}
IMPORTANT: You have {max_steps} maximum steps. You are on step {step}.
Follow this EXACT step-by-step reasoning and action pattern:
1. THOUGHT: Think about what information you need to answer the question.
2. ACTION: Either use a tool OR write "FINAL" if you're ready to give your final answer.
Available tools:
{tools}
Always structure your response with these exact headings:
THOUGHT: [your reasoning]
ACTION: [tool_name] OR simply write "FINAL"
"""
# Helper function to extract sections from responses
def extract_section(text, section_name):
pattern = rf'{section_name}:?\s*(.*?)(?=\n\s*(?:THOUGHT|ACTION):|$)'
match = re.search(pattern, text, re.DOTALL | re.IGNORECASE)
return match.group(1).strip() if match else ""
# Execute ReAct planning loop
def run_react_loop(question, max_steps=5):
step = 1
while step <= max_steps:
# Dynamic system prompt with current step
react_system_prompt = REACT_PROMPT.format(
date=datetime.now().strftime("%Y-%m-%d"),
tools=["stock_info"],
step=step,
max_steps=max_steps,
)
# Agent with updated system prompt
agent = Agent(
agent_name="financial_planner",
system_prompt=react_system_prompt,
reset=False, # Maintain memory between steps
)
# Get agent's response for current step
response = agent.chat(question)
# Extract action to determine next step
action = extract_section(response, "ACTION")
# Check if agent is ready for final answer
if "FINAL" in action.upper():
break
# Call tool if needed
if "stock_info" in action.lower():
tool_agent = Agent(
agent_name="financial_planner",
tools=pxt.tools(stock_info)
)
tool_agent.tool_call(question)
step += 1
# Generate final recommendation
return Agent(agent_name="financial_planner").chat(question)
# Run the planning loop
recommendation = run_react_loop("Create an investment recommendation for AAPL")
```
## Architecture
At its core, Pixelagent implements a clean, modular architecture that separates concerns while maintaining flexibility. This diagram illustrates the main components and their relationships, showing how the system integrates LLM providers, memory, tools, and orchestration into a cohesive whole.
```mermaid
flowchart TB
subgraph Agent ["Agent Architecture"]
LLM["LLM Provider\n(OpenAI/Anthropic)"]
Memory["Memory\n(Persistent Storage)"]
Tools["Tools\n(Python Functions)"]
Orchestration["Orchestration\n(Pixeltable Core)"]
end
LLM <--> Orchestration
Memory <--> Orchestration
Tools <--> Orchestration
User["User"] <--> Agent
```
## Tutorials and Examples
We provide comprehensive examples and tutorials to help you get started quickly and master advanced concepts. These resources range from basic implementation guides to sophisticated patterns for specialized use cases, ensuring you have the knowledge to build exactly what you need.
Step-by-step introduction to core concepts
Explore reflection and planning techniques
Browse examples for deeper implementations
Ready to start building? Dive into the blueprints, tweak them to your needs, and let Pixeltable handle the AI data infrastructure while you focus on innovation!
# Pixeltable YOLOX
Source: https://docs.pixeltable.com/docs/libraries/yolox
Lightweight object detection library built on PyTorch
View the source code and contribute to Pixeltable YOLOX
`pixeltable-yolox` is a lightweight, Apache-licensed object detection library built on PyTorch. It is a fork of the MegVii [YOLOX](https://github.com/Megvii-BaseDetection/YOLOX) package originally authored by Zheng Ge et al, modernized for recent versions of Python and refactored to be more easily usable as a Python library.
`pixeltable-yolox` is still a work in progress! Some features of YoloX have not been ported yet.
Pixeltable YOLOX is designed for developers seeking a modern, easy-to-use object detection library. While still under development, it offers a robust foundation for both academic and commercial projects.
### Installation
```bash
pip install pixeltable-yolox
```
### Inference
```python
import requests
from PIL import Image
from yolox.models import Yolox, YoloxProcessor
url = "https://raw.githubusercontent.com/pixeltable/pixeltable-yolox/main/tests/data/000000000001.jpg"
image = Image.open(requests.get(url, stream=True).raw)
model = Yolox.from_pretrained("yolox_s")
processor = YoloxProcessor("yolox_s")
tensor = processor([image])
output = model(tensor)
result = processor.postprocess([image], output)
# The labels are COCO category indices.
from yolox.data.datasets import COCO_CLASSES
print(COCO_CLASSES[result[0]['labels'][0]]) # Example: Print the first detected object's class name
```
This yields the following output:
```python
[{'bboxes': [
(272.36126708984375, 3.5648040771484375, 640.4871826171875, 223.2653350830078),
(26.643890380859375, 118.68254089355469, 459.80706787109375, 315.089111328125),
(259.41485595703125, 152.3223114013672, 295.37054443359375, 230.41783142089844)],
'scores': [0.9417160943584335, 0.8170979975670818, 0.8095869439224117],
'labels': [7, 2, 12]}]
```
The labels are COCO category indices.
```python
from yolox.data.datasets import COCO_CLASSES
print(COCO_CLASSES[7])
# Output: 'truck'
```
## Training
First unpack a COCO dataset into `./datasets/COCO`:
```
COCO/
annotations/
instances_train2017.json
instances_val2017.json
train2017/
# image files
val2017/
# image files
```
Then on the command line:
```bash
yolox train -c yolox-s -d 8 -b 64 --fp16 -o
```
For help:
```bash
yolox train -h
```
## Background
The original YOLOX implementation, while powerful, has been updated only sporadically since 2022 and now faces compatibility issues with current Python environments, dependencies, and platforms like Google Colab. This fork aims to provide a reliable, up-to-date, and easy-to-use version of YOLOX that maintains its Apache license, ensuring it remains accessible for academic and commercial use.
## Who are we and why are we doing this?
Pixeltable, Inc. is a venture-backed AI infrastructure startup. Our core product is [Pixeltable](https://pixeltable.com), a database and orchestration system purpose-built for multimodal AI workloads.
Pixeltable integrates with numerous AI services and open source technologies. In the course of integrating with YOLOX, it became clear that there is a strong need in the vision community for a lightweight object detection library with an untainted open source license. It also became clear that while YOLOX is an excellent foundation, it would benefit greatly from code modernization and more regular updates.
We chose to build upon YOLOX both to simplify our own integration, and also to give something back to the community that will (hopefully) prove useful. The Pixeltable team has decades of collective experience in open source development. Our backgrounds include companies such as Google, Cloudera, Twitter, Amazon, and Airbnb, that have a strong commitment to open source development and collaboration.
## Contributing
Join our community and contribute to Pixeltable YOLOX
We welcome contributions from the community! If you're interested in helping maintain and improve `pixeltable-yolox`, please stay tuned for our contributor's guide which will be published after the initial release.
# Building with LLMs
Source: https://docs.pixeltable.com/docs/overview/building-on-pixeltable
Use LLMs in your Pixeltable integration workflow
# Building Pixeltable with LLMs
You can use large language models (LLMs) to assist in building Pixeltable integrations. We provide a set of tools and best practices if you use LLMs during development.
## Plain text docs
You can access all of our documentation as plain text markdown files by adding `.md` to the end of any url. For example, you can find the plain text version of this page itself at [https://docs.pixeltable.com/libraries/building-on-pixeltable.md](https://docs.pixeltable.com/libraries/building-on-pixeltable.md).
This helps AI tools and agents consume our content and allows you to copy and paste the entire contents of a doc into an LLM. This format is preferable to scraping or copying from our HTML and JavaScript-rendered pages because:
* Plain text contains fewer formatting tokens.
* Content that isn't rendered in the default view (for example, it's hidden in a tab) of a given page is rendered in the plain text version.
* LLMs can parse and understand markdown hierarchy.
We host two files to assist AI tools and agents:
1. [/llms.txt](https://docs.pixeltable.com/llms.txt): This file instructs how to retrieve plain text versions of our pages. It follows the [emerging standard](https://llmstxt.org/) for making websites and content more accessible to LLMs.
2. [/llms-full.txt](https://docs.pixeltable.com/llms-full.txt): This file contains more comprehensive instructions and metadata about our documentation structure.
These files help AI tools navigate and understand our documentation more effectively.
## Pixeltable Model Context Protocol (MCP) Server
For developers using code editors that use AI, such as Cursor or Windsurf, or general purpose tools such as Claude Desktop, we provide the [Pixeltable Model Context Protocol (MCP)](/docs/libraries/mcp) server. The MCP server provides AI agents a set of tools for calling the Pixeltable API and searching our knowledge base (documentation, support articles, and so on).
View the source code and contribute to our Pixeltable MCP servers
## Pixelagent Toolkit
If you're building agentic software, we provide an SDK for adding Pixeltable functionality to your agent's capabilities.
Agent engineering blueprint powered on Pixeltable
* Multi-agent systems
* Tool calling
* State management
* Observability
Learn more in our [Pixelagent documentation](/docs/libraries/pixelagent).
## See Also
* [Model Context Protocol](/docs/libraries/mcp)
* [Pixelagent](/docs/libraries/pixelagent)
* [Custom Functions](/docs/datastore/custom-functions)
* [Base SDK Server GitHub Repository](https://github.com/pixeltable/pixeltable-mcp-server/tree/main/servers/base-sdk)
* [MCP Specification](https://spec.modelcontextprotocol.io/)
# Installation
Source: https://docs.pixeltable.com/docs/overview/installation
Complete guide to installing and setting up Pixeltable
Use Pixeltable directly in Google Colab: [Pixeltable Basics Tutorial](https://colab.research.google.com/github/pixeltable/pixeltable/blob/release/docs/notebooks/pixeltable-basics.ipynb).
## Local Pixeltable Runtime
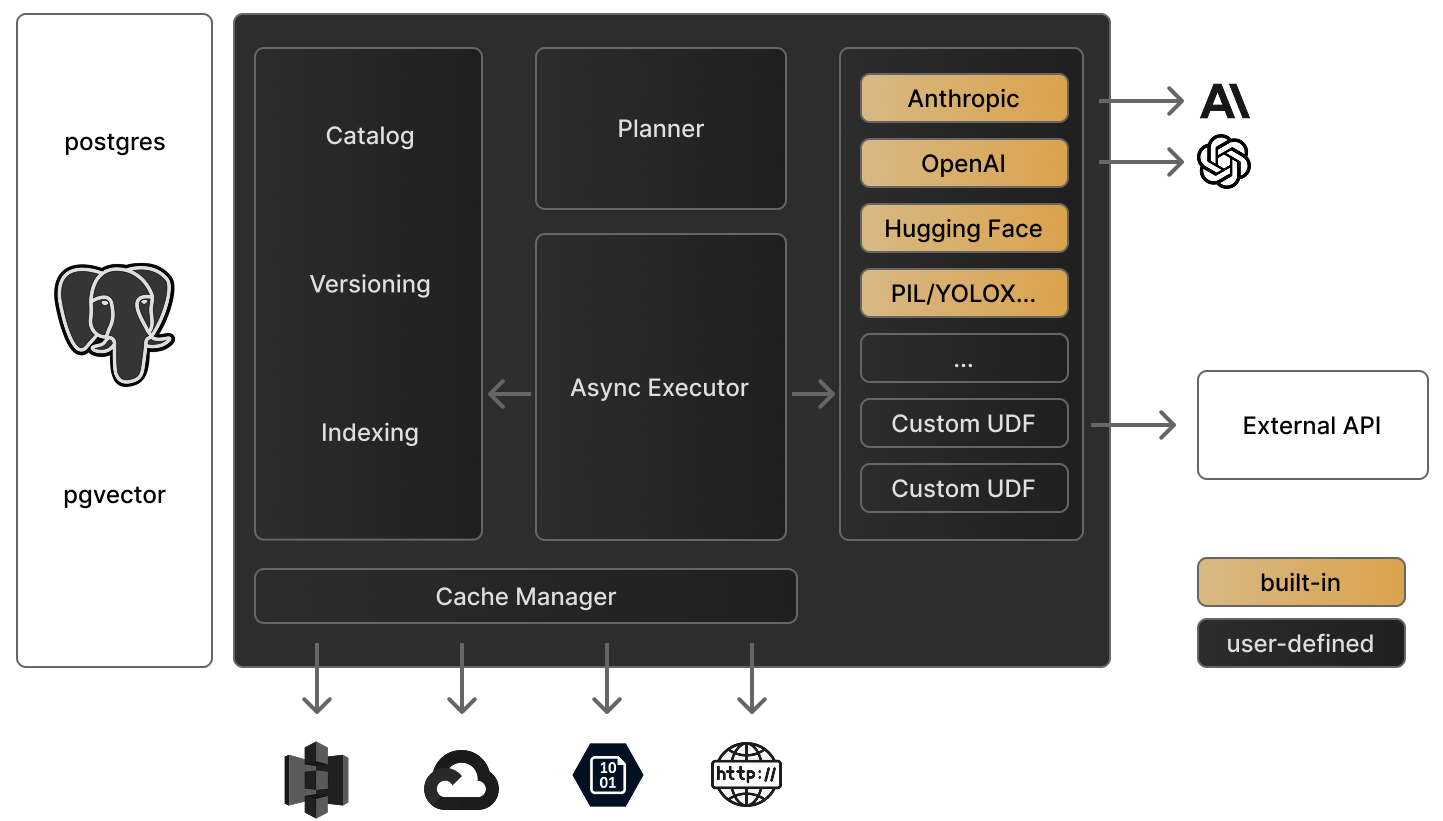
## System Requirements
Before installing, ensure your system meets these requirements:
* Python 3.9 or higher
* Linux, MacOs, or Windows
```bash
python -m venv venv
```
This creates an isolated Python environment for your Pixeltable installation.
```bash Windows
venv\Scripts\activate
```
```bash Linux/MacOS
source venv/bin/activate
```
```bash
pip install pixeltable
```
Download and install from [Miniconda Installation Guide](https://docs.anaconda.com/free/miniconda/miniconda-install/)
```bash
conda create --name pxt python=3.11
conda activate pxt
```
```bash
pip install pixeltable
```
## Notebooks
If not already installed:
```bash
pip install jupyter
```
```bash
jupyter notebook
```
Select "Python 3 (ipykernel)" as the kernel via File / New / Notebook
```python
import pixeltable as pxt
pxt.init()
```
Wait a minute for Pixeltable to load. You should see a message once connected to the database.
***
### Configuration Options
Pixeltable can be configured through:
* Environment variables
* System configuration file (`~/.pixeltable/config.toml` on Linux/macOS or `C:\Users\\.pixeltable\config.toml` on Windows)
Example `config.toml`:
```toml
[pixeltable]
file_cache_size_g = 250
time_zone = "America/Los_Angeles"
hide_warnings = true
verbosity = 2
[openai]
api_key = 'my-openai-api-key'
[label_studio]
url = 'http://localhost:8080/'
api_key = 'my-label-studio-api-key'
```
### System Settings
| Environment Variable | Config File | Meaning |
| -------------------------------- | --------------------------------------- | ------------------------------------------------------------------------------------------------------------------------------------------- |
| PIXELTABLE\_HOME | | (string) Pixeltable user directory; default is \~/.pixeltable |
| PIXELTABLE\_CONFIG | | (string) Pixeltable config file; default is \$PIXELTABLE\_HOME/config.toml |
| PIXELTABLE\_PGDATA | | (string) Directory where Pixeltable DB is stored; default is \$PIXELTABLE\_HOME/pgdata |
| PIXELTABLE\_DB | | (string) Pixeltable database name; default is pixeltable |
| PIXELTABLE\_FILE\_CACHE\_SIZE\_G | \[pixeltable] file\_cache\_size\_g | (float) Maximum size of the Pixeltable file cache, in GiB; required |
| PIXELTABLE\_TIME\_ZONE | \[pixeltable] time\_zone | (string) Default time zone in [IANA format](https://en.wikipedia.org/wiki/List_of_tz_database_time_zones); defaults to the system time zone |
| PIXELTABLE\_HIDE\_WARNINGS | \[pixeltable] hide\_warnings | (bool) Suppress warnings generated by various libraries used by Pixeltable; default is false |
| PIXELTABLE\_VERBOSITY | \[pixeltable] verbosity | (int) Verbosity for Pixeltable console logging (0: minimum, 1: normal, 2: maximum); default is 1 |
### API Configuration
| Environment Variable | Config File | Meaning |
| ----------------------- | ------------------------------ | -------------------------------------------------- |
| ANTHROPIC\_API\_KEY | \[anthropic] api\_key | (string) API key to use for Anthropic services |
| DEEPSEEK\_API\_KEY | \[deepseek] api\_key | (string) API key to use for Deepseek services |
| FIREWORKS\_API\_KEY | \[fireworks] api\_key | (string) API key to use for Fireworks AI services |
| GEMINI\_API\_KEY | \[gemini] api\_key | (string) API key to use for Google Gemini services |
| LABEL\_STUDIO\_API\_KEY | \[label\_studio] api\_key | (string) API key to use for Label Studio |
| LABEL\_STUDIO\_URL | \[label\_studio] url | (string) URL of the Label Studio server to use |
| MISTRAL\_API\_KEY | \[mistral] api\_key | (string) API key to use for Mistral AI services |
| OPENAI\_API\_KEY | \[openai] api\_key | (string) API key to use for OpenAI services |
| REPLICATE\_API\_TOKEN | \[replicate] api\_token | (string) API token to use for Replicate services |
| TOGETHER\_API\_KEY | \[together] api\_key | (string) API key to use for Together AI services |
## Troubleshooting
Common installation issues and solutions:
If you encounter package conflicts:
```bash
pip install --upgrade pip
pip cache purge
pip install -U pixeltable --no-cache-dir
```
If Pixeltable fails to initialize:
1. First, restart your Python session or kernel
2. Then try initializing again:
```python
import pixeltable as pxt
pxt.init()
```
1. Install [pytorch](https://pytorch.org/get-started/locally/)
2. Pixeltable will automatically use GPU once torch is installed.
## Next Steps
Build your first AI application with Pixeltable
Explore example applications and use cases
## Getting Help
* 💬 Join our [Discord Community](https://discord.gg/pixeltable)
* 🐛 Report issues on [GitHub](https://github.com/pixeltable/pixeltable/issues)
* 📧 Contact [support@pixeltable.com](mailto:support@pixeltable.com)
# Introduction
Source: https://docs.pixeltable.com/docs/overview/pixeltable
Pixeltable is a declarative data infrastructure for building multimodal AI applications, enabling incremental storage, transformation, indexing, and orchestration of data.
All data and computed results are automatically stored and versioned.
Define transformations once; they run automatically on new data.
Handle images, video, audio, and text seamlessly in one unified interface.
Built-in support for AI services like OpenAI, YOLOX, Together, Label Studio, Replicate...
The below steps will get you started in 1 minute. Learn more by looking at this tutorial on [Github](https://github.com/pixeltable/pixeltable/blob/main/docs/notebooks/pixeltable-basics.ipynb).
## Getting Started
```bash
pip install pixeltable
```
Get up and running with basic [tables](/docs/datastore/tables-and-operations), [queries](/docs/datastore/filtering-and-selecting), and [computed columns](docs/datastore/computed-columns).
```python table
# Create a table to hold data
t = pxt.create_table('films_table', {
'name': pxt.String,
'revenue': pxt.Float,
'budget': pxt.Float
})
```
```python query
# Insert data into a table
t.insert([
{'name': 'Inside Out', 'revenue': 800.5, 'budget': 200.0},
{'name': 'Toy Story', 'revenue': 1073.4, 'budget': 200.0}
])
# Retrieves all the rows in the table.
t.collect()
```
```python transform
# Add a new column for the profit calculation
t.add_computed_column(profit=(t.revenue - t.budget))
# It will automatically compute its value for all rows
t.select(t.profit).head()
```
All data and computed results are automatically stored and versioned.
Add [LLMs](/docs/integrations/frameworks#cloud-llm-providers), [computer vision](/docs/examples/vision/yolox), [embeddings indices](docs/datastore/embedding-index), and build your first [multimodal app](/docs/examples/chat/multimodal).
```python embedding index
from pixeltable.functions.huggingface import clip
import PIL.Image
# create embedding index on the 'img' column of table 't'
t.add_embedding_index(
'img',
embedding=clip.using(model_id='openai/clip-vit-base-patch32')
)
# index is kept up-to-date enabling relevant searches
sim = t.img.similarity(sample_img)
res = (
t.order_by(sim, asc=False) # Order by similarity
.where(t.id != 6) # Metadata filtering
.limit(2) # Limit number of results to 2
.select(t.id, t.img, sim)
.collect() # Retrieve results now
)
```
```python llms
from pixeltable.functions import openai
# Assemble the prompt and instructions
messages = [
{
'role': 'system',
'content': 'Please read the following passages.'
},
{
'role': 'user',
'content': t.prompt # generated from the 'prompt' column
}
]
# Add a computed column that calls OpenAI
t.add_computed_column(
response=openai.chat_completions(model='gpt-4o-mini',
messages=messages)
)
```
```python computer vision
from pixeltable.ext.functions.yolox import yolox
# compute object detections using the `yolox_tiny` model
frames_view.add_computed_column(detect_yolox_tiny=yolox(
frames_view.frame, model_id='yolox_tiny', threshold=0.25
))
# The inference in the computed column is now stored
frames_view.select(
frames_view.frame,
frames_view.detect_yolox_tiny
).show(3)
```
Pixeltable orchestrates model execution, ensuring results are stored, indexed, and accessible through the same query interface.
Handle [production data](/docs/datastore/bringing-data) volumes, and deploy your application.
```python bring cloud data
# Import media data (videos, images, audio...)
v = pxt.create_table('videos', {'video': pxt.Video})
prefix = 's3://multimedia-commons/'
paths = [
'data/videos/mp4/ffe/ffb/ffeffbef41bbc269810b2a1a888de.mp4',
'data/videos/mp4/ffe/feb/ffefebb41485539f964760e6115fbc44.mp4',
'data/videos/mp4/ffe/f73/ffef7384d698b5f70d411c696247169.mp4'
]
v.insert({'video': prefix + p} for p in paths)
```
```python chunking with views
# Optimize large-scale data processing
from pixeltable.iterators import DocumentSplitter
# Create chunked views for efficient processing
doc_chunks = pxt.create_view(
'chunks',
analysis,
iterator=DocumentSplitter.create(
document=analysis.document,
separators='sentence',
limit=500 # Control chunk size
)
)
```
```python serving
from fastapi import FastAPI, HTTPException
from pydantic import BaseModel
app = FastAPI()
class AnalysisRequest(BaseModel):
document: str
metadata: dict = {}
@app.post("/analyze")
async def analyze_document(request: AnalysisRequest):
try:
# Insert document for processing
analysis.insert([{
'document': request.document,
'metadata': request.metadata,
'timestamp': datetime.now()
}])
# Get analysis results using computed columns
result = analysis.select(
analysis.embeddings,
analysis.summary,
analysis.sentiment
).tail(1)
return {
"status": "success",
"results": result.to_dict('records')[0]
}
except Exception as e:
raise HTTPException(status_code=0, detail=str(e))
```
Handle images, video, audio, numbers, array and text seamlessly in one interface.
## Popular Use Cases
Build RAG systems that compare multiple LLMs with ground truth evaluation.
Create context-aware chat bots with semantic search and memory.
Build tool-calling agents
Real-time object detection in videos using YOLOX.
Text and image similarity search on video frames.
Analyze video calls with automatic transcription and insights.
Convert documents to natural speech with context-aware processing.
Generate social posts from video content analysis.
Build AI-powered collaborative writing tools.
Test and compare LLM performance with structured evaluation.
Real-time trading analysis using AI for technical indicators.
Create interactive AI storytelling experiences.
## Next Steps
Working implementations and reference architecture
Technical discussions and implementation support
Explore the codebase and contribute
# Quick Start
Source: https://docs.pixeltable.com/docs/overview/quick-start
Welcome to Pixeltable! In this tutorial, we will survey how to create tables, populate them with data, and enhance them with built-in and user-defined transformations and AI operations.
This guide will get you from zero to a working AI application in under 5 minutes. Learn more by looking at this tutorial on [Github](https://github.com/pixeltable/pixeltable/blob/main/docs/notebooks/pixeltable-basics.ipynb).
## Create Your First Multimodal AI Application
Let's build an image analysis application that combines object detection and OpenAI Vision.
## Installation
Please refer to our installation section [here](/docs/overview/installation).
```bash
pip install -qU torch transformers openai pixeltable
```
```python
import pixeltable as pxt
# Create directory for our tables
pxt.drop_dir('demo', force=True)
pxt.create_dir('demo')
# Create table with image column
t = pxt.create_table('demo.first', {'input_image': pxt.Image})
```
This creates a persistent and versioned table that holds data.
```python
from pixeltable.functions import huggingface
# Add ResNet-50 object detection
t.add_computed_column(
detections=huggingface.detr_for_object_detection(
t.input_image,
model_id='facebook/detr-resnet-50'
)
)
# Extract just the labels
t.add_computed_column(detections_text=t.detections.label_text)
```
Computed columns are populated whenever new data is added to their input columns.
```python
import os
import getpass
from pixeltable.functions import openai
if 'OPENAI_API_KEY' not in os.environ:
os.environ['OPENAI_API_KEY'] = getpass.getpass('Enter your OpenAI API key:')
t.add_computed_column(
vision=openai.vision(
prompt="Describe what's in this image.",
image=t.input_image,
model='gpt-4o-mini'
)
)
```
Pixeltable handles parallelization, rate limiting, and incremental processing automatically.
```python
# Insert an image
t.insert(input_image='https://raw.github.com/pixeltable/pixeltable/release/docs/resources/images/000000000025.jpg')
# Retrieve results
t.select(
t.input_image,
t.detections_text,
t.vision
).collect()
```
The query engine uses lazy evaluation, only computing what's needed.
Pixeltable automatically:
1. Created a persistent table
2. Downloaded and cached the ResNet model
3. Orchestrated the OpenAI API call
4. Created an efficient processing workflow
5. Stored all results for future use
## Key Features
All data and computed results are automatically stored and versioned. Your app state persists between sessions.
Define transformations once, they run automatically on new data. Perfect for AI orchestration.
Handle images, video, audio, and text seamlessly in one unified interface.
Built-in support for popular AI services like OpenAI, YOLOX, Hugging Face, Label Studio, Replicate, Anthropic...
## Custom Functions (UDFs)
Extend Pixeltable with your own functions using the `@pxt.udf` decorator:
```python
@pxt.udf
def top_detection(detect: dict) -> str:
scores = detect['scores']
label_text = detect['label_text']
i = scores.index(max(scores))
return label_text[i]
# Use it in a computed column
t.add_computed_column(top=top_detection(t.detections))
```
## Next Steps
Build a production-grade RAG system
Process video with object detection
Work with OpenAI and other LLM providers
# FAQ
Source: https://docs.pixeltable.com/docs/support/faq
Frequently asked questions about Pixeltable
## Core Concepts
Pixeltable is open-source AI data infrastructure providing a declarative, incremental approach for multimodal workloads. It unifies data management, transformation, and AI model execution under a table-like interface. Key features:
* **Unified Interface**: Manages text, images, video, and audio in a single framework
* **Declarative Design**: Defines transformations and model inference as computed columns
* **Incremental Processing**: Automatically handles caching and selective recomputation
* **Type System**: Provides data validation for multimodal content types
```python
import pixeltable as pxt
from pixeltable.iterators import DocumentSplitter
# Create multimodal table for RAG
docs = pxt.create_table('chatbot.documents', {
'document': pxt.Document, # PDF/Text files
'video': pxt.Video, # MP4 videos
'audio': pxt.Audio, # Audio files
'timestamp': pxt.Timestamp
})
# Create view for document chunking
chunks = pxt.create_view(
'chatbot.chunks',
docs,
iterator=DocumentSplitter.create(
document=docs.document,
separators='sentence',
metadata='title,heading'
)
)
# Add embedding index for search
chunks.add_embedding_index(
'text',
string_embed=sentence_transformer
)
```
Pixeltable's data management approach includes:
* **Media Storage**: References external files (videos, images, documents) in their original locations
* **Incremental Computation**: Recomputes only affected parts of the workflow when inputs change
* **Type System**: Handles various data types including tensors, embeddings, and structured data
* **Computed Columns**: Defines transformations as functions of other columns
* **Built-in Functions**: Provides pre-implemented operations for common AI tasks
```python
# Example video processing
frames = pxt.create_view(
'video_search.frames',
videos,
iterator=FrameIterator.create(
video=videos.video,
fps=1 # Extract 1 frame per second
)
)
# Add multimodal search
frames.add_embedding_index(
'frame',
string_embed=clip_text, # For text-to-image search
image_embed=clip_image # For image-to-image search
)
```
Pixeltable's architecture includes views and computed columns:
**Views**
* Virtual tables generated from base tables using iterators (e.g., DocumentSplitter, FrameIterator)
* Enable efficient chunking of documents or extraction of video frames
* Support embedding indexes for similarity search
```python
# Create document chunks view
chunks = pxt.create_view(
'docs.chunks',
docs,
iterator=DocumentSplitter.create(
document=docs.document,
separators='sentence'
)
)
```
**Computed Columns**
* Columns defined as functions of other columns
* Update automatically when their dependencies change
* Can invoke external services (e.g., LLMs, embedding models)
* Implement custom logic via User-Defined Functions (UDFs)
```python
# Example computed column for generating embeddings
docs_table.add_computed_column(
embeddings=openai.embeddings(
docs_table.text,
model='text-embedding-3-small'
)
)
# Custom UDF example
@pxt.udf
def create_prompt(context: list[dict], question: str) -> str:
context_text = "\n".join(item['text'] for item in context)
return f"Context:\n{context_text}\n\nQuestion: {question}"
# Using the UDF in a computed column
docs_table.add_computed_column(
prompt=create_prompt(docs_table.context, docs_table.question)
)
```
## Features & Capabilities
**Data Management**
* Handles text, images, video, and audio in a unified framework
* Maintains data lineage and version history
* Provides caching mechanisms for efficiency
**RAG Implementation**
* Supports document chunking with configurable strategies
* Manages embedding generation and indexing
* Enables similarity search for context retrieval
* Integrates with various LLM providers
**Media Processing**
* Extracts and processes video frames
* Supports audio transcription and analysis
* Enables cross-modal search (e.g., searching videos with text)
**Development Features**
* Implements computations declaratively
* Processes updates incrementally
* Provides type validation for data integrity
* Supports SQL-like queries for data selection
Pixeltable implements RAG workflows through:
```python
# Create chunks view
chunks = pxt.create_view(
'chatbot.chunks',
docs,
iterator=DocumentSplitter.create(
document=docs.document,
separators='sentence',
metadata='title,heading'
)
)
# Add embedding index
chunks.add_embedding_index(
'text',
string_embed=sentence_transformer
)
# Define context retrieval query
@chunks.query
def get_context(query: str):
sim = chunks.text.similarity(query)
return chunks.order_by(sim, asc=False).limit(5)
# Generate response with context
docs.add_computed_column(
context=get_context(docs.question)
)
docs.add_computed_column(
response=openai.chat_completions(
messages=create_prompt(
docs.context,
docs.question
),
model='gpt-4o'
)
)
```
Pixeltable supports video and image workflows:
```python
# Frame extraction
frames = pxt.create_view(
'video_search.frames',
videos,
iterator=FrameIterator.create(
video=videos.video,
fps=1
)
)
# Object detection
frames.add_computed_column(
detections=yolox(
frames.frame,
model_id='yolox_tiny',
threshold=0.25
)
)
# Cross-modal search
frames.add_embedding_index(
'frame',
string_embed=clip_text, # For text-to-image search
image_embed=clip_image # For image-to-image search
)
# Text query for video frames
results = frames.frame.similarity("person walking on beach")
.order_by(sim, asc=False)
.limit(5)
.collect()
```
## Integration & Deployment
Pixeltable provides integrations with:
```python
from pixeltable.functions import openai, anthropic
from pixeltable.functions.huggingface import (
sentence_transformer,
clip_image,
clip_text
)
# OpenAI integrations
table.add_computed_column(
embeddings=openai.embeddings(
table.text,
model='text-embedding-3-small'
)
)
# Anthropic integrations
table.add_computed_column(
analysis=anthropic.messages(
model='claude-3-sonnet-20240229',
messages=table.prompt
)
)
# Hugging Face integrations
table.add_computed_column(
image_embeddings=clip_image(
table.image,
model_id='openai/clip-vit-base-patch32'
)
)
```
Pixeltable also supports local model inference via Ollama, LlamaCPP, and other integrations.
Pixeltable integrates with web frameworks like FastAPI and Gradio:
```python
# FastAPI + Pixeltable example
@app.post("/chat")
async def chat(message: ChatMessage):
# Insert question
chat_table.insert([{
'question': message.message,
'timestamp': datetime.now()
}])
# Get answer (computed columns handle RAG pipeline)
result = chat_table.select(
chat_table.response
).where(
chat_table.question == message.message
).collect()
return JSONResponse(
status_code=200,
content={"response": result['response'][0]}
)
```
## Using Pixeltable
Pixeltable is designed for:
**Retrieval-Augmented Generation (RAG)**
* Document processing, chunking, and embedding
* Context retrieval and relevance ranking
* LLM integration for question answering
* Multimodal RAG with support for text, video, audio sources
**Video and Image Analysis**
* Frame extraction and processing
* Object detection and analysis
* Semantic search across video content
* Content transcription and analysis
**ML Workflow Management**
* Data preparation and transformation
* Feature extraction and engineering
* Model inference orchestration
* Data versioning and lineage tracking
Key technical characteristics:
1. **Declarative Computation Model**
* Defines data transformations as computed columns
* Automatically manages dependency graphs
* Uses SQL-like operations for data manipulation
* Tracks data lineage at column level
2. **Multimodal Data Support**
* Handles diverse data types with a consistent interface
* Provides built-in transformations for different modalities
* Supports cross-modal operations (e.g., text-to-image search)
* Manages storage and processing efficiency
3. **Incremental Computation**
* Recomputes only what's necessary when data changes
* Caches intermediate results
* Versions data automatically
* Optimizes computational resource usage
Pixeltable's technical specifications:
* **Python Version**: 3.9 or higher
* **Media Storage**: References external files in local, remote, or cloud storage
* **Memory Requirements**: Varies based on dataset size and transformations
* **GPU Support**: Optional, beneficial for computer vision tasks and local LLM inference
* **OS Support**: Linux, macOS, Windows
Pixeltable can be installed via pip:
```bash
pip install pixeltable
```
# Getting Help
Source: https://docs.pixeltable.com/docs/support/getting-help
Connect with the Pixeltable community and find support
Get real-time help from our community
Report issues and contribute code
Browse our API reference
Schedule time with our team
# Feature Guides
Source: https://docs.pixeltable.com/docs/tutorials/feature-guide
Deep dive into Pixeltable advanced capabilities and patterns
These feature guides demonstrate key Pixeltable capabilities through practical examples and detailed explanations. Each guide is available as an interactive Jupyter notebook.
These tutorials are available as interactive Jupyter notebooks on our [Github repository](https://github.com/pixeltable/pixeltable/tree/main/docs/notebooks/fundamentals).
## Essential Features
Learn how Pixeltable efficiently manages external media files (videos, images, audio) through references and automatic local caching of remote files from S3 and other sources
Master Pixeltable's UDF capabilities to extend functionality with custom Python logic in expressions and computed columns
## Advanced Features
Explore Pixeltable's declarative indexing system for similarity search across any data type, with automatic index maintenance and efficient lookups
Understand how Pixeltable ensures consistent timestamp handling across time zones through UTC storage and precise arithmetic
## Key Capabilities
Define what you want, not how to do it - Pixeltable handles the implementation details
Smart local caching of remote files for optimal performance
Reliable timestamp handling across datasets and deployments
## Implementation Patterns
Extend Pixeltable with Python functions for any workflow
Build semantic search with automatic index maintenance
Seamlessly work with files in S3 and other cloud storage
These guides assume basic familiarity with Pixeltable. New to Pixeltable? Start with our [Getting Started Guide](/docs/getting-started) or join our [Discord community](https://discord.com/invite/QPyqFYx2UN) for help.
# Fundamentals
Source: https://docs.pixeltable.com/docs/tutorials/fundamentals
Learn Pixeltable core concepts and capabilities through interactive tutorials
Welcome to Pixeltable fundamentals! These tutorials will help you understand Pixeltable's core capabilities for managing multimodal data and machine learning workflows.
These tutorials are available as interactive Jupyter notebooks on our [Github repository](https://github.com/pixeltable/pixeltable/tree/main/docs/notebooks/fundamentals).
## Core Concepts
{/* Fundamentals Card Grid */}
Create and manage multimodal data tables, import datasets, and perform essential operations like filtering, selecting, and ordering data using Pixeltable's intuitive interface
Leverage Pixeltable's powerful computed columns to automate data transformations, integrate ML models, and create dynamic data workflows with automatic versioning and lineage tracking
Master Pixeltable's expressive query system for complex data operations, from simple filters to advanced transformations across images, video, text and embeddings
Need help? Join our [Discord community](https://discord.gg/QPyqFYx2UN) for support and discussions with other users.
 ## Content Generation & Analysis